
MongoDB is a popular non-relational database solution. Does it pair well with Spring Boot? You bet it does! In this post, we’re going to show you how to use MongoDB as the storage mechanism for a Spring Boot application. While we’re at it, we’ll show you how to add a feature flags to your application.
A feature flag—aka feature toggle or feature switch—is a technique that allows you to hide certain features of your application from certain users or segments of users. Such an ability is very powerful: among other things, it allows you to streamline your software release life cycle since you can ship code containing partially completed features knowing that your users won’t be able to access them. Feature toggling also enables you to roll out a feature for a portion of your user base, thereby facilitating processes such as A/B testing and canary releases.
Let’s begin.
Deploy Continuously with Confidence – Sign up for a Split demo!

Speed up development cycles, reduce release risk, and focus your team on DevOps best practices that create maximum impact. Get a personalized demo today!
Spring Boot and MongoDB: Let’s Create a CRUD App
To demonstrate that Spring Boot and MongoDB can be quite a great team, we’ll be writing a CRUD application. The application will be a simple issue tracker that will enable us to insert, edit, read, and delete issues, each containing a description, a severity level, a timestamp, and an assignee.
Let’s start by installing and configuring all you need to get going.
Install MongoDB
You need MongoDB for this tutorial, but for brevity’s sake, we won’t walk you through installing it. Head to the MongoDB manual, and see the installation instructions for your specific platform.
Review the Java Requirements
Before you go further, let’s make sure your environment has all you need. For starters, make sure that you have JDK installed (I’ll use version 1.8, but newer versions should work just as fine) and that your JAVA_HOME environmental variable is set. I’ll use Maven as my build system, but you can use Gradle if you like it better.
I’ll also use the free community edition of IntelliJ IDEA as my IDE in this tutorial. Although using it will make following along easier, you can certainly use whatever IDE or text editor you want.
Obtain the Split SDK
Your next step should be signing up for a free Split account and then logging in. You’ll see a “DE” button in the upper left corner, which is the workspace button. Click on it, and then click on “Admin settings.”
After that, click on “API Keys” in the left panel. You’ll see the available keys for all of your environments. For this guide, you’ll use an SDK key for the staging-default environment. Just click on “Copy” and the key will be available in your clipboard.
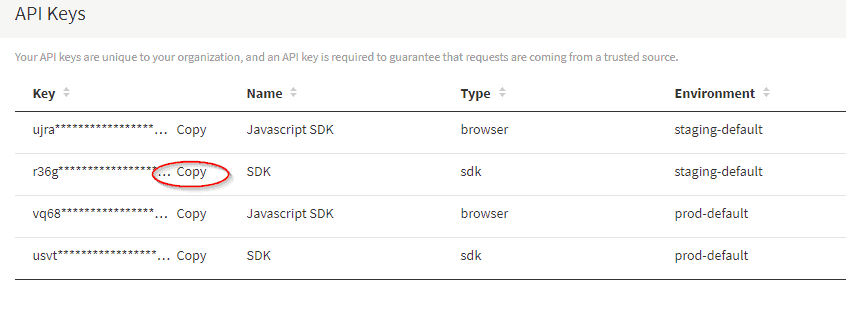
For now, keep your key somewhere safe. You’ll need it soon.
Bootstrap the Application With Spring Initializr
Spring Initializr offers us a quick and easy way to start a new Spring Boot application. Go there and change the options like this:
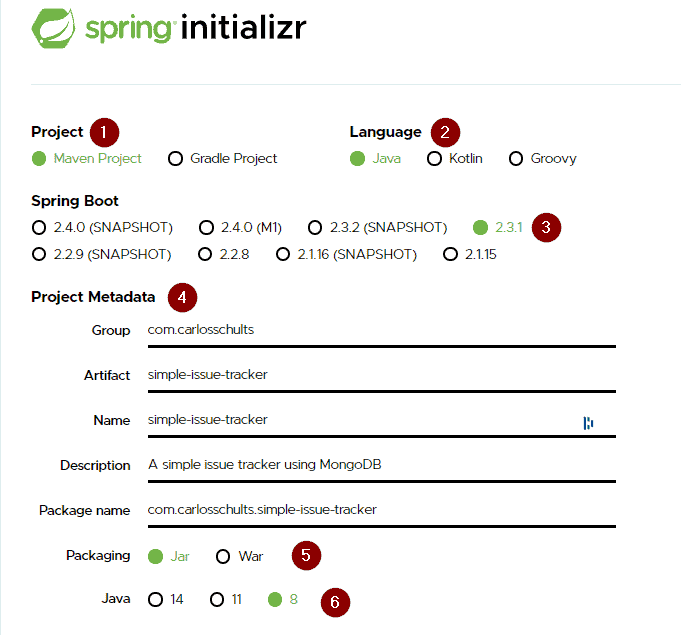
- Project: Maven Project. As I’ve mentioned, I’m using Maven for this post, but you can of course use Gradle if you’re more comfortable with it
- Language: Java. Even though Kotlin is such a nice language, let’s use Java, for no other reason than to cater to the maximum number of people
- Spring Boot: 2.3.3
- Project Metadata: Write whatever you like, or just leave the default values. Name the artifact:
simple-issue-tracker - Packaging: Let’s stick with Jar
- Java Version: I’ve chosen version 8, but again, choose whatever you feel like
After that, you’ll need to add some dependencies:
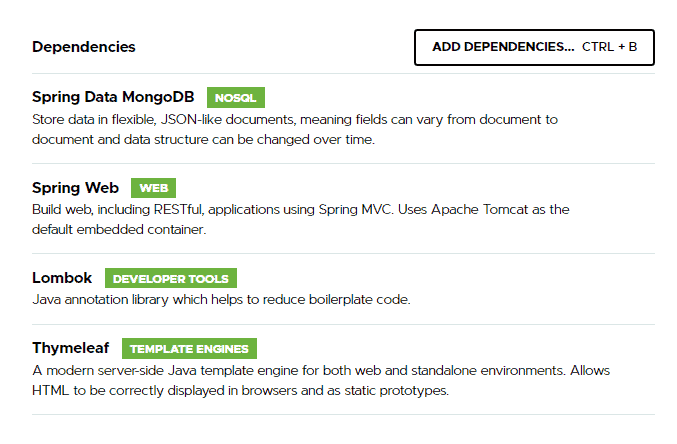
I’ve selected four dependencies: Spring Data MongoDB, Spring Web, Thymeleaf, and Lombok. Lombok is optional, but it’s going to help us get rid of a lot of boilerplate code.
After everything is configured, click on the “Generate” button to download a zip file containing the source code of your project. Unzip it in an easy-to-access location, and open the project using IntelliJ IDEA or your favorite IDE.
Create the Collection in MongoDB
At this point, you won’t touch the app for a while. Instead, let’s have some fun with MongoDB. Head over to your terminal, and start MongoDB by running the command mongod. If everything went well, you should be able to locate the following message:
NETWORK [listener] Listening on 127.0.0.1
NETWORK [listener] waiting for connections on port 27017Code language: CSS (css)Now, with this terminal window opened, open another one and connect to MongoDB by running the command mongo.
MongoDB stores data as documents in the BSON format. Documents are stored in a collection, which, in turn, are held in databases. So, create a new database and switch to it by running this:
use mydatabase;Code language: PHP (php)Then, create a new collection, and include a new document in it with a single step:
db.issues.insertOne(
    {
        description: "This is my first issue",
        severity: 1,
        assignee: "Carlos"
    }
)Code language: CSS (css)
After you run the command, MongoDB will display a message telling you that your command was executed successfully and showing the ID of your newly created document:
{
        "acknowledged" : true,
        "insertedId" : ObjectId("5f12e5d93fb0d91516fb5af2")
}Code language: JSON / JSON with Comments (json)
Repeat the process a few times to populate your collection with some documents.
Done? Time to go back to the Java side of things.
Put It All Together
Let’s begin by doing the M of the MVC pattern, creating the model for your application. Create a new package called model. Add a new class to it called Issue, and paste the following code on it:
@Document(collection = "issues")
public class Issue {

    @Id
    private String id;
    private final String description;
    private final int severity;
    private final String assignee;

    public Issue(String description, int severity, String assignee) {
        this.description = description;
        this.severity = severity;
        this.assignee = assignee;
    }

    public String getId() { return id; }

    public void setId(String id) {this.id = id; }

    public String getDescription() {
        return description;
    }

    public String getAssignee() {
        return assignee;
    }

    public int getSeverity() {
        return severity;
    }
}Code language: Arduino (arduino)
The @Document annotation allows us to define the name of the MongoDB collection that will hold your data. The @Getter and @Setter annotations on top of the class are from Lombok. That way the getters and setters are automatically generated, sparing us from having to write lots of boilerplate code.
Now you’re going to create a repository. Create a new package called repository, and inside it, create a new interface called IssueRepository. It should contain the following code:
@Repository
public interface IssueRepository extends MongoRepository<Issue, String> {}Code language: Java (java)
That’s right: you’re not defining any methods in the interface, at least for now. You’ll see that just by extending from the MongoRepository interface, there’s already a lot you can do.
For the next step, let’s create your controller. You already know the drill: create a new package called controller, containing a new class named IssueController:
@Controller
public class IssueController {

    private IssueRepository repository;

    public IssueController(IssueRepository repository) {
        this.repository = repository;
    }

    @GetMapping("/issues")
    public String getAllIssues(Model model) {
        model.addAttribute("issues", repository.findAll());
        return "list-issues";
    }
}Code language: Java (java)
The only letter you still haven’t tackled is the V, for View. So let’s remediate that by adding the first view to your application. Create a new HTML file called list-issues.html in the src/resources/templates folder. This is the default folder for Thymeleaf templates. And, this file name matches the returned value from the getAllIssues method above. Add the following content to it:
<!DOCTYPE html>
<html xmlns:th="http://www.thymeleaf.org">
    <head>
        <title>Issues</title>
        <meta http-equiv="Content-Type" content="text/html; charset=UTF-8" />
    </head>
    <body>
        <div th:switch="${issues}">
            <h2 th:case="null">No issues yet!</h2>
            <div th:case="*">
                <h2>Issues</h2>
                <table>
                    <thead>
                    <tr>
                        <th>Description</th>
                        <th>Severity</th>
                        <th>Assignee</th>
                        <th>Edit</th>
                        <th>Delete</th>
                    </tr>
                    </thead>
                    <tbody>
                    <tr th:each="issue : ${issues}">
                        <td th:text="${issue.description}"></td>
                        <td th:text="${issue.severity}"></td>
                        <td th:text="${issue.assignee}"></td>
                        <td><a th:href="@{/edit/{id}(id=${issue.id})}">Edit</a></td>
                        <td><a th:href="@{/delete/{id}(id=${issue.id})}">Delete</a></td>
                    </tr>
                    </tbody>
                </table>
            </div>
            <p><a href="/signup">Add a new issue</a></p>
        </div>
    </body>
</html>Code language: Django (django)
Now, let’s add a final detail before running your application. Go to the resources/application.properties file, and add the following content to it:
spring.data.mongodb.host=localhost
spring.data.mongodb.port=27017
spring.data.mongodb.database=mydatabase
That will allow your application to correctly connect to your MongoDB database.
Run the MongoDB + Spring Boot Application
By now, you should be ready to run your application. Go to the SimpleIssueTrackerApplication class, and add the following annotation before its declaration:
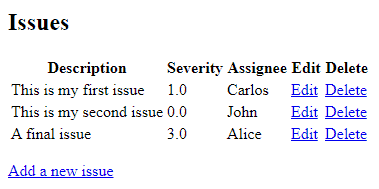
@EnableMongoRepositories(basePackageClasses = IssueRepository.class)Code language: Ruby (ruby)Then, execute the class by clicking on the play button of your IDE. If everything went right, you should be able to go to localhost:8080/issues and see the issues you added via MongoDB:
Add Feature Flags to Your Spring Boot + MongoDB App
Let’s say that the team needs to add a new feature to this app. And the feature is simple: when listing issues, they should be ordered by their severity levels, from the most severe to the least. So, in the example above, the first issue should be the “A final issue” one, since it has the highest severity.
You’ll create the feature but hide it using a feature toggle. That way, you could even deploy the feature to production but keep it deactivated.
Add the Feature Flag
Let’s start by adding the Java Split SDK to the project. Add the following dependency to your pom.xml file:
<dependency>
  <groupId>io.split.client</groupId>
  <artifactId>java-client</artifactId>
  <version>3.3.3</version>
</dependency>Code language: Django (django)
Build the application, and if no errors happen, you’re good to go. The next step is to create a config class. At the project’s root level, add a new class called SimpleIssueTrackerConfig with the following code:
@Configuration
public class SimpleIssueTrackerConfig {

    @Value("#{ @environment['split.api-key'] }")
    private String splitApiKey;

    @Bean
    public SplitClient splitClient() throws Exception {
        SplitClientConfig config = SplitClientConfig.builder()
                .setBlockUntilReadyTimeout(1000)
                .enableDebug()
                .build();

        SplitFactory splitFactory = SplitFactoryBuilder.build(splitApiKey, config);
        SplitClient client = splitFactory.client();
        client.blockUntilReady();

        return client;
    }
}Code language: Java (java)
You’ll want to make sure that you update the resources/application.properties to add your Split api key:
split.api-key=<YOUR-API-KEY>Code language: Django (django)Now, let’s change the controller so it receives an instance of SplitClient in its constructor:
private SplitClient splitClient;

public IssuesController(IssueRepository repository, SplitClient splitClient) {
    this.repository = repository;
    this.splitClient = splitClient;
}Code language: Arduino (arduino)
Finally, let’s change the getAllIssues method, so it can order the issues by their severity when your feature flag is on:
String treatment = splitClient.getTreatment("ANONYMOUS_USER", "SORT_ISSUES");

Iterable<Issue> issues = repository.findAll();
if ("on".equals(treatment)) {
    issues = StreamSupport
        .stream(issues.spliterator(), false)
        .sorted((issue1, issue2) -> Long.compare(issue2.getSeverity(), issue1.getSeverity()))
        .collect(Collectors.toList());
}

model.addAttribute("issues", issues);
return "list-issues";Code language: Arduino (arduino)
Create and Manage the Split
The next and final step is actually creating the treatment using Split.
On your Split dashboard, click Splits on the left. Click Create Split. Name is SORT_ISSUES. Click Create.
Next, click Add Rules and then Save Changes. Then, click Confirm.
By default, it will setup the on and off states, the default being off.
As before, browse to: http://localhost:8080/issues. At this point, you should see no change in the list from earlier.
If you return to your Split dashboard, you can change the default state from off to on in the Set Default Rule section of the SORT_ISSUES treatment.
Click Save Changes and Confirm again.
Now, when you refresh the page in the browser, you should see the list off issues in descending order by severity.
You can see using the Split treatment allows you to change behavior without even having to restart the Spring Boot application.
Spring Boot and MongoDB: A Dynamic Duo
Databases don’t live on the relational model alone. Instead, they can exist in a variety of shapes and forms. The NoSQL movement is certainly a big part of that, and MongoDB is one of the most popular—if not the most popular—NoSQL database.
In today’s post, we’ve shown how MongoDB might be a viable choice of database for your Spring Boot application and also how you can add a feature flag to this app and why you’d want to do so.
If you’re like to learn more about Spring Boot, feature flags, or testing in production, we have some great resources for you:
- Achieve Continuous Deployment with Feature Flags
- Get Started with Feature Flags in Node
- How to Implement Testing in Production
- Increase Your Productivity by Testing in Production
- Monitor Your Feature Flag Performance with New Relic
As always, if you’re looking for more great content like this, we’d love to have you follow us on Twitter @splitsoftware, and subscribe to our YouTube channel.
Get Split Certified
Split Arcade includes product explainer videos, clickable product tutorials, manipulatable code examples, and interactive challenges.
Deliver Features That Matter, Faster. And Exhale.
Split is a feature management platform that attributes insightful data to everything you release. Whether your team is looking to test in production, perform gradual rollouts, or experiment with new features–Split ensures your efforts are safe, visible, and highly impactful. What a Release. Get going with a free account, schedule a demo to learn more, or contact us for further questions and support.