
If you’re a developer, chances are you’ve released thousands of features — but how do you ensure those features are working properly in production before you release them to all your users? If you ask me, the answer is feature flags.
A feature flag is a piece of conditional code that allows a software development team to separate code deployment from feature release. Feature flags are beneficial because they allow you to test your code in production, perform canary releases, and even conduct A/B testing. React makes it easy to implement these flags. Let me show you how!
In this tutorial, you are going to create a feature flag in the Split UI (where feature flags are called “splits”), and then you are going to add it to a sample app so you can see it in action. Let’s dive in!
Implement Feature Flags with React
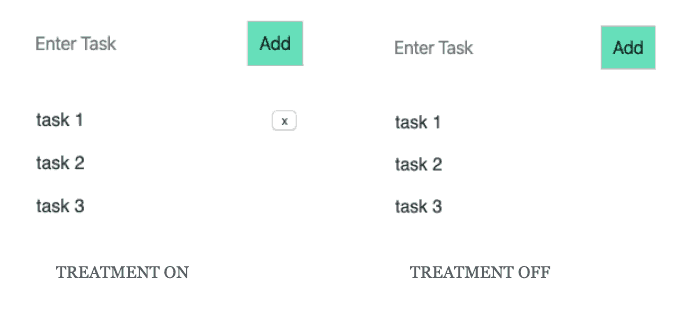
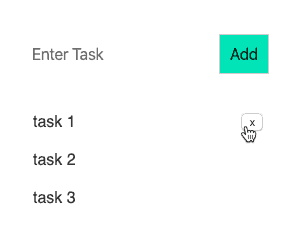
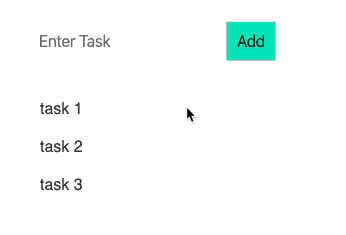
The app that I will be adding feature flags to in this example is a basic to-do list app. You want to add the ability to control whether the current user can delete tasks. I want to roll this functionality out in a controlled way, using feature flags. In Split, possible states of feature flags (like “on” or “off” or any other value) are called treatments. In our case, when the treatment is on, the user will be able to delete tasks, and when the treatment is off, the user will not be able to delete tasks. Here’s what it would look like in each case.
After you log in to Split, navigate to the Splits section on the left panel. Go ahead and click Create Split. If you need a Split account, you can grab one for free before you get started.
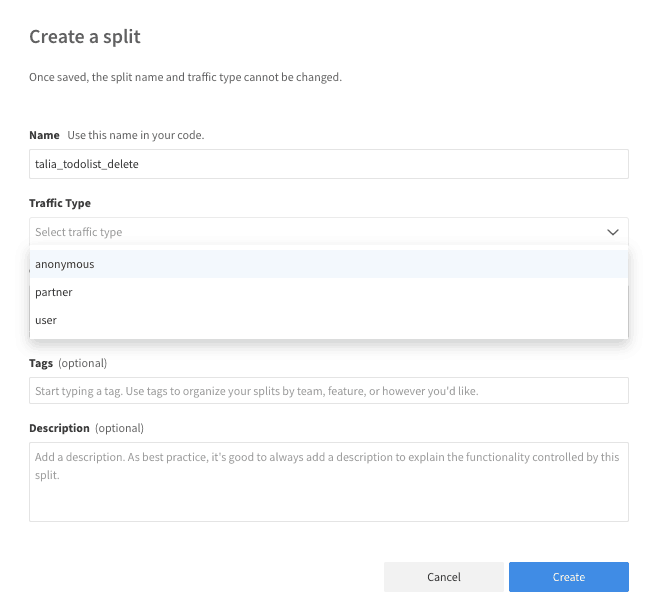
In the Create a split popup, be sure to fill out the following fields:
Name
You should name your split something unique that is descriptive of what you will be releasing. Some companies like to use their project ticket number inside the split name as well to be able to specify which ticket is linked to which split. For more details on naming conventions and best practices, watch this video!
Traffic Type
When you first open Split, you will only see user in this dropdown. You can add more traffic types later. This dropdown allows you to select what differentiates the people who see your new feature initially to the people who will see what currently exists.
This is what you’ll see after you create your split:
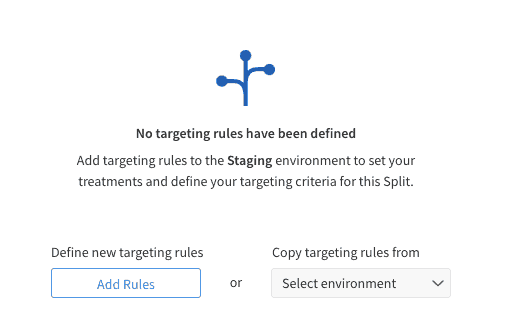
Once you click on Add Rules, you will be able to configure your split.
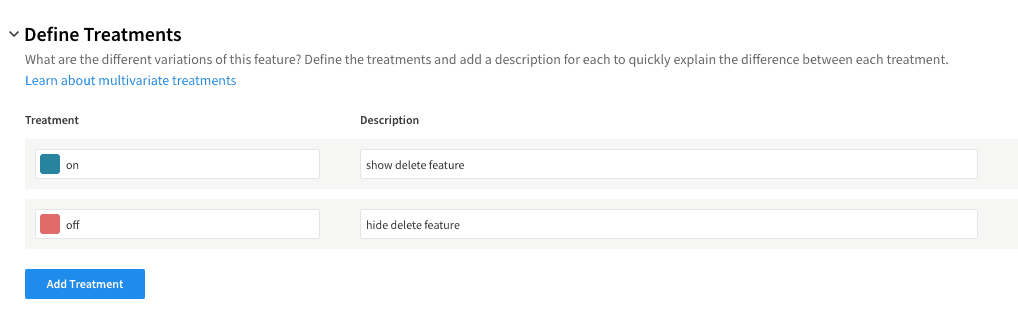
You can see the default treatments of “on” and “off” here. Let’s fill out the Description fields so we’ll remember how this split is used.
The most important part here is the targeting rules, where you’ll define who will be targeted inside your feature flag.
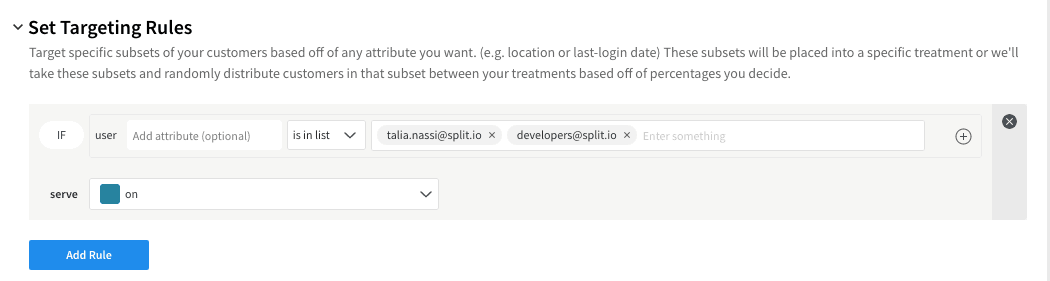
Be sure to keep the Default Rule off:

Install Dependencies and Configure Your React App
After you create your react app with create-react-app, go ahead and install the following dependency in your root folder:
npm install --save @splitsoftware/splitio-react@1.1.0Be sure to check out our documentation for the latest version.
Now you will have two options. Either you can use the SplitFactory component, or you can use the withSplitFactory Higher Order Component (HOC). We are going to use the withSplitFactory HOC. At the top of your component, import SplitTreatments and withSplitFactory from Split. SplitTreatments is a React Component that performs feature evaluation. The withSplitFactory HOC is used to wrap the TodoList component when I export it.
import {
  SplitTreatments,
  withSplitFactory,
} from "@splitsoftware/splitio-react";Then, divide your render function in two. In the first render function, return the treatment and configuration from SplitTreatments:
<SplitTreatments names={["talia_todolist_delete"]}>
  {({ treatments }) => {
    return this.renderContent(treatments["talia_todolist_delete"]);
  }}
</SplitTreatments>In the names prop, pass in the name of your feature flag from the UI. Note that this must exactly match the name you inputted while creating your split in the Split UI above.
In the second render function, called renderContent, create a variable named allowDelete that differentiates between treatment on and off. If the treatment is on, you are allowing the user to delete tasks. If the treatment is off, there is no option to delete.
So here’s what renderContent looks like:
renderContent(deleteTreatment) {
  const allowDelete = deleteTreatment.treatment === "on";
  return (
    <div className="todoListMain">
      <div className="header">
        <form onSubmit={this.addItem}>
          <input
            ref={(a) => (this._inputElement = a)}
            placeholder="Enter Task"
          ></input>
          <button type="submit">Add</button>
        </form>
      </div>
      <TodoItems
        entries={this.state.items}
        allowDelete={allowDelete}
        delete={this.deleteItem}
      />
    </div>
  );
}After the render functions, insert the configuration that you will use to configure your split instance. This initializes withSplitFactory, which is the entry point of the library.
Each Split user has their own auth key. Find yours in the Syntax section of the three-dot menu “…” as seen below:
const sdkConfig = {
  core: {
    authorizationKey: "myauthkey1234567890",
    key: "talia.nassi@split.io",
  },
  debug: true,
};The key parameter is telling Split who the current user is. So in this case when you run npm start you will see the delete buttons because you are targeted in the feature flag.
When you set debug: true, you are able to see all of the logs from Split in the browser console. You should pay attention to two things here. The first is that you can clearly see that I am the person who is getting the treatment. The second is that you can see that the treatment is set to on for me.

Now watch what happens when you change the key to a test user who is not in the split:
const sdkConfig = {
  core: {
    authorizationKey: "myauthkey1234567890",
    key: "test.user@split.io",
  },
  debug: true,
};
The delete buttons disappear. Why? Because this user is not targeted — only developers and myself are.
All of the above code lives in my ToDoList Higher Order Component. In my TodoItems component, I have a function called createTasks that gets called in my render function that conditionally renders the delete button if the allowDelete variable is set to true:
createTasks(item) {
  return (
    <li key={item.key}>
      {item.text}
      {this.props.allowDelete && (
        <button onClick={() => this.delete(item.key)}>x</button>
      )}
    </li>
  );
}

render() {
  var todoEntries = this.props.entries;
  var listItems = todoEntries.map(this.createTasks);
  return <ul className="theList">{listItems}</ul>;
}In the future, I could use this feature flag configuration to deploy all of my changes in a controlled fashion. I could also deploy to production while keeping the flag off by default, and testing the feature in production to ensure functionality. Once I know its working in prod, then I could release incrementally to users or all at once, without any code changes.
To see the full code, see my GitHub repo.
Learn More about Feature Flags and our SDKs
If you’re interested in learning how to implement feature flags with our other SDKs, check out our documentation, and to learn about integrations that you can use with your React app, check out the following posts:
- Build High-Performing Features With Google Analytics and Feature Flags
- Bring Your Customer and Feature Data Together with mParticle and Split
- Querying Split Impressions in New Relic for More Insight into Your Metrics
And as always, we’d love to have you follow along as we produce new content. Catch us on Twitter @splitsoftware, or on our YouTube channel!
Get Split Certified
Split Arcade includes product explainer videos, clickable product tutorials, manipulatable code examples, and interactive challenges.
Deliver Features That Matter, Faster. And Exhale.
Split is a feature management platform that attributes insightful data to everything you release. Whether your team is looking to test in production, perform gradual rollouts, or experiment with new features–Split ensures your efforts are safe, visible, and highly impactful. What a Release. Get going with a free account, schedule a demo to learn more, or contact us for further questions and support.