Creating a server that stores data in the database and responds to user requests through a RESTful API doesn’t need to be scary or time-consuming. In this tutorial, I’ll walk you through the process using the popular combination of a JavaScript-driven Node.js server-side environment and a Postgres database.
Over the course of the post, you’ll:
- Create a server-side application with Node and Express that works with mocked in-memory data
- Create a Postgres database to persist data as a new feature of your app
- Deploy the database feature to a specific portion of users with feature flags by Split
- Test how the application works with multiple branching scenarios
- Completely migrate the app to the new database once testing is complete
Hopefully, you’ll have some fun along the way, as the example app you’re going to build will store a database of scary horror movies and their ratings!
Node, Express, and Postgres Prerequisites
To build along, you’ll need Node.js and npm installed and a forever-free Split account. Simple!
The next sections will walk you through creating your Node.js app from scratch. The full code example is available in this splitio-examples GitHub repo if you want to follow along that way as well.
Set Up the Express Server
Start by creating a project directory and navigate to its root folder:
mkdir node-postgres
cd node-postgresCode language: Bash (bash)Initialize npm in the project by running npm init, which will create a package.json file. Alternatively, you can copy this JSON structure to a package.json that you make on your own:
{
  "name": "node-postgres-api",
  "version": "1.0.0",
  "description": "RESTful API with Node.js, Express, and PostgreSQL",
  "main": "app.js",
  "scripts": {}
}Code language: JSON / JSON with Comments (json)
The next thing you need is to install Express.js.
npm i expressCode language: Matlab (matlab)Create an app.js file where the server application will run:
const express = require('express');
const app = express();
const port = 5000;

app.use(express.json());

app.listen(port, () => {
  console.log(`Horror movie app is running on port ${port}.`);
});Code language: JavaScript (javascript)
The Express module is required to create a server, and the line containing app.use(express.json()) is utilizing middleware for parsing the requests that you’ll be sending later in this tutorial. Note that the server is running on port 5000, meaning that the base URL where the application runs is http://localhost:5000.
At this point, it would be good to install the utility package Nodemon, which will speed up your development by automatically restarting the server after each change. Nodemon is installed as a development dependency.
npm i nodemon -DCode language: Matlab (matlab)In the package.json file, inside the scripts property, add a script named serve with the nodemon app.js command, which will start the server.
...
"scripts": {
    "serve": "nodemon app.js"
  }
...Code language: Bash (bash)
Now you can start your server by simply running:
npm run serveCode language: Arduino (arduino)What you should see in the command line is this:

Without Nodemon, you can always run your app directly by node app.js.
What’s a Server without Endpoints?
You’ll agree that running a server just for the sake of it doesn’t make much of a difference in this world. So you’ll want to add some endpoints (routes) to it. Say you’re a big movie fan, and you want to list your favorite horror movies by rating. Of course, over time you’ll need to add new horror movies to the list? Maybe change or even delete some? It’s always a good idea to make a model of all the endpoints youcan imagine you’ll need:
GET /horrors– fetch all horror moviesGET /horrors/:id– fetch a single horror movie by its IDPOST /horrors– create a new horror movie entryPUT /horrors/:id– update a existing horror horror movie entryDELETE /horrors/:id– delete a horror movie
These endpoints are integrated into the app.js server file in no time, but there needs to be some logic behind them, as every endpoint has to return a specific response to the user. With that in mind, the next file to create is api.js, where that logic is implemented. In the first iteration, the server will work only with a hardcoded list of horror movies that is persisted only in memory while the application runs. Once the server is restarted, the horror movie list will be reset to the initial state.
| You probably agree that having a hardcoded list of data can be a quick and dirty solution for an ad-hoc prototype, but eventually, you’ll want to change the in-memory data with the persisted one – a database. And that’s exactly what you do later, in a gradual, safe, feature flag driven fashion. |
This is the hardcoded list of horror movies you’ll use as a starting point inside api.js:
const inMemoryHorrors = [
  {
    name: 'The Hills Have Eyes',
    rating: 7.8
  },
  {
    name: 'Night of the Living Dead',
    rating: 9.0
  },
  {
    name: 'Scream',
    rating: 7.2
  }
];Code language: C# (cs)
The function to get all the horror movies will just return that list:
const getAllHorrors = async (request, response) => {
  response.status(200).json(inMemoryHorrors);
};Code language: C# (cs)
Request for a single horror movie will always return the first one from the list, no matter what id is provided:
const getHorrorById = (request, response) => {
  response.status(200).json(inMemoryHorrors[0]);
};Code language: JavaScript (javascript)
The other CRUD endpoints are also aligned with the in-memory list. The creation of a new horror movie adds a new item to the list. An update always makes changes to the first list item, and delete always removes the first horror movie in the list. You’re probably thinking: not too clever, and you’re absolutely right, but remember, it’s just a starting mockup of your app. The intent is that it’s just enough to navigate the initial development cycle, prototype presentation phase, and numerous design tweaks at the very start.
const addHorror = async (request, response) => {
  const { name, rating } = request.body;
  inMemoryHorrors.push({ name, rating });
  response.status(201).send(`Horror added successfully.`);
};

const updateHorror = (request, response) => {
  const { name, rating } = request.body;
  inMemoryHorrors[0] = { name, rating };
  response.status(200).send(`First horror in list is updated.`);
};

const deleteHorror = (request, response) => {
  inMemoryHorrors.shift();
  response.status(200).send(`First horror in list is deleted.`);
};Code language: JavaScript (javascript)
Put Your Node Server Together
All these functions need to be exported from the api.js file to be consumed outside of it. So you should write down everything you’re exposing from this file with module.exports syntax, which is part of the CommonJS module system, essential for Node.js environments.
module.exports = {
  getAllHorrors,
  getHorrorById,
  addHorror,
  updateHorror,
  deleteHorror
};Code language: Java (java)
This completes api.js.
Great! You have now written down all the functions that perform operations inside the database and exported them. Unfortunately, this still doesn’t do much for your app, as those functions are not being used just yet. But, now, you’ll connect them with the server in a simple way. In the app.js add the following lines:
const api = require('./api');

app.get('/horrors/', api.getAllHorrors);
app.get('/horrors/:id', api.getHorrorById);
app.post('/horrors/', api.addHorror);
app.put('/horrors/:id', api.updateHorror);
app.delete('/horrors/:id', api.deleteHorror);Code language: C# (cs)
This effectively creates five endpoints inside the Express server. When an HTTP request comes to your server, its URL and HTTP methods are matched against the configured endpoints on the server. If the URL (the first parameter in the get, post, put and delete methods of the app object above) and HTTP method match a specific route configuration, then a function (i.e., a middleware, the second parameter) runs.
Appropriately configured, the API should always return some kind of a response, either the resource that is requested, usually along with HTTP 2xx status or some other kind of response, like error (4xx and 5xx) or redirect(3xx).
Finally, the mock server can be easily tested with curl. Running this line in your terminal should return the initial list of horror movies:
curl http://localhost:5000/horrorsCode language: Arduino (arduino)Feel free to experiment with other endpoints, and bear in mind it will all get reset once you restart the server.
Create a Local Database with Postgres
Having a mock server is nice, but eventually, you’ll want your app to store the data after it stops running. You’ll want to set up a database and then connect it to your app. Sounds complicated? Well, it isn’t, thanks to Postgres.
PostgreSQL is an open-source relational database management system. Postgres has been around for more than two decades, and it is a trusted choice in the database market, popular equally among freelance developers and enterprises.
If you are a Windows user, you can find the installation guide for Postgres here. Mac users that have Homebrew installed can simply install Postgres from the terminal. If you don’t have Homebrew, take a look here for how to install it.
brew install postgresqlCode language: SQL (Structured Query Language) (sql)What you’ve installed here, among other things, is a database server. That is a service that can be started (or stopped) with Homebrew. The following line starts the database server from the terminal:
brew services start postgresql
==> Successfully started `postgresql` (label: homebrew.mxcl.postgresql)Code language: SQL (Structured Query Language) (sql)
At any point, the database server can be stopped with brew services stop postgresql.
Another thing that comes with the installation is the psql – PostgreSQL interactive terminal. Running psql will connect you to a PostgreSQL host from the terminal and allow you to perform database operations from the command line. When you install Postgres, you get one default database named – postgres. So you’ll first connect to it via psql:
psql postgresYou are now inside psql in the postgres database. You should see the text below in your terminal now, which means you’re connected to the postgres database as superuser, or root (the # mark is for superuser).
postgres=#Code language: Bash (bash)But, you won’t use the default database or any database as a superuser. You’ll create your user and database, and it’s not all that complicated. Start with creating your own role moviefan with a password scarymovie.
CREATE ROLE moviefan WITH LOGIN PASSWORD 'scarymovie';Code language: SQL (Structured Query Language) (sql)Don’t get confused by “role” here. In the Postgres world, role is a superset concept that wraps both users and groups. To put it simply, you’re using it here to create a user. Also, the new user that you’ve made needs some access rights. You want your user to be able to create a database.
ALTER ROLE moviefan CREATEDB;Code language: SQL (Structured Query Language) (sql)Check if you’ve done everything in order, you can list all users by \du. Just note that, if installed on a Mac OS with Homebrew, the role name for the Postgres superuser will be the same as the name of the logged-in user that installed it. In Linux systems, it would default to postgres.
| Role name | Attributes | Member of |
|---|---|---|
| <your username> | Superuser, Create role, Create DB, Replication, Bypass RLS | {} |
| moviefan | Create DB | {} |
Your work with superuser privileges is done here. You now proceed using the psql as moviefan user. But before that, you need to quit the terminal as a superuser with \q.
Now you are again outside of the psql terminal and in your “regular” one. You can connect to the postgres database with the moviefan user now:
psql -d postgres -U moviefanThe terminal now shows postgres=>, which is an indicator of not being logged in as a superuser anymore. The next thing in line is to create a database.
CREATE DATABASE movies;Code language: SQL (Structured Query Language) (sql)Then, connect to the newly created movies database using the \c (connect) command.
\c movies
You are now connected to the database “movies” as user “moviefan”.Code language: Delphi (delphi)
Before switching back to Node, let’s create a table in the newly formed database. You’ll create a table horrors with three fields: name field of varchar type, rating field of decimal type, and an id field, which is a primary key.
CREATE TABLE horrors (
  ID SERIAL PRIMARY KEY,
  name VARCHAR(40),
  rating DECIMAL
);Code language: SQL (Structured Query Language) (sql)
Also, the table can be populated with some initial data.
INSERT INTO horrors (name, rating)
  VALUES ('The Ring', 8.6), ('The Exorcist', 8.8), ('The Nightmare On Elm Street', 8.2);Code language: SQL (Structured Query Language) (sql)
Finally, check on the created data with a select statement.
SELECT * FROM horrors;
 id |            name             | rating
----+-----------------------------+--------
  1 | The Ring                    |    8.6
  2 | The Exorcist                |    8.8
  3 | The Nightmare On Elm Street |    8.2Code language: Gherkin (gherkin)
Node + Feature Flags
Feature flags are an excellent tool for delivering your app’s features to a specific portion of your audience. Let’s say you have a new feature coming up, but you’re still not ready to let it go into the wild. In other words, you want your QA team to get the taste of this new feature first.
Inside this tutorial, the new feature will be the database that you’ll soon connect with the server, and, at first, expose it only to the users behind a qa@movies.com email. To create a feature flag, you’ll need access to Split application. If you don’t have a free Split account yet, you’ll need to sign up now.
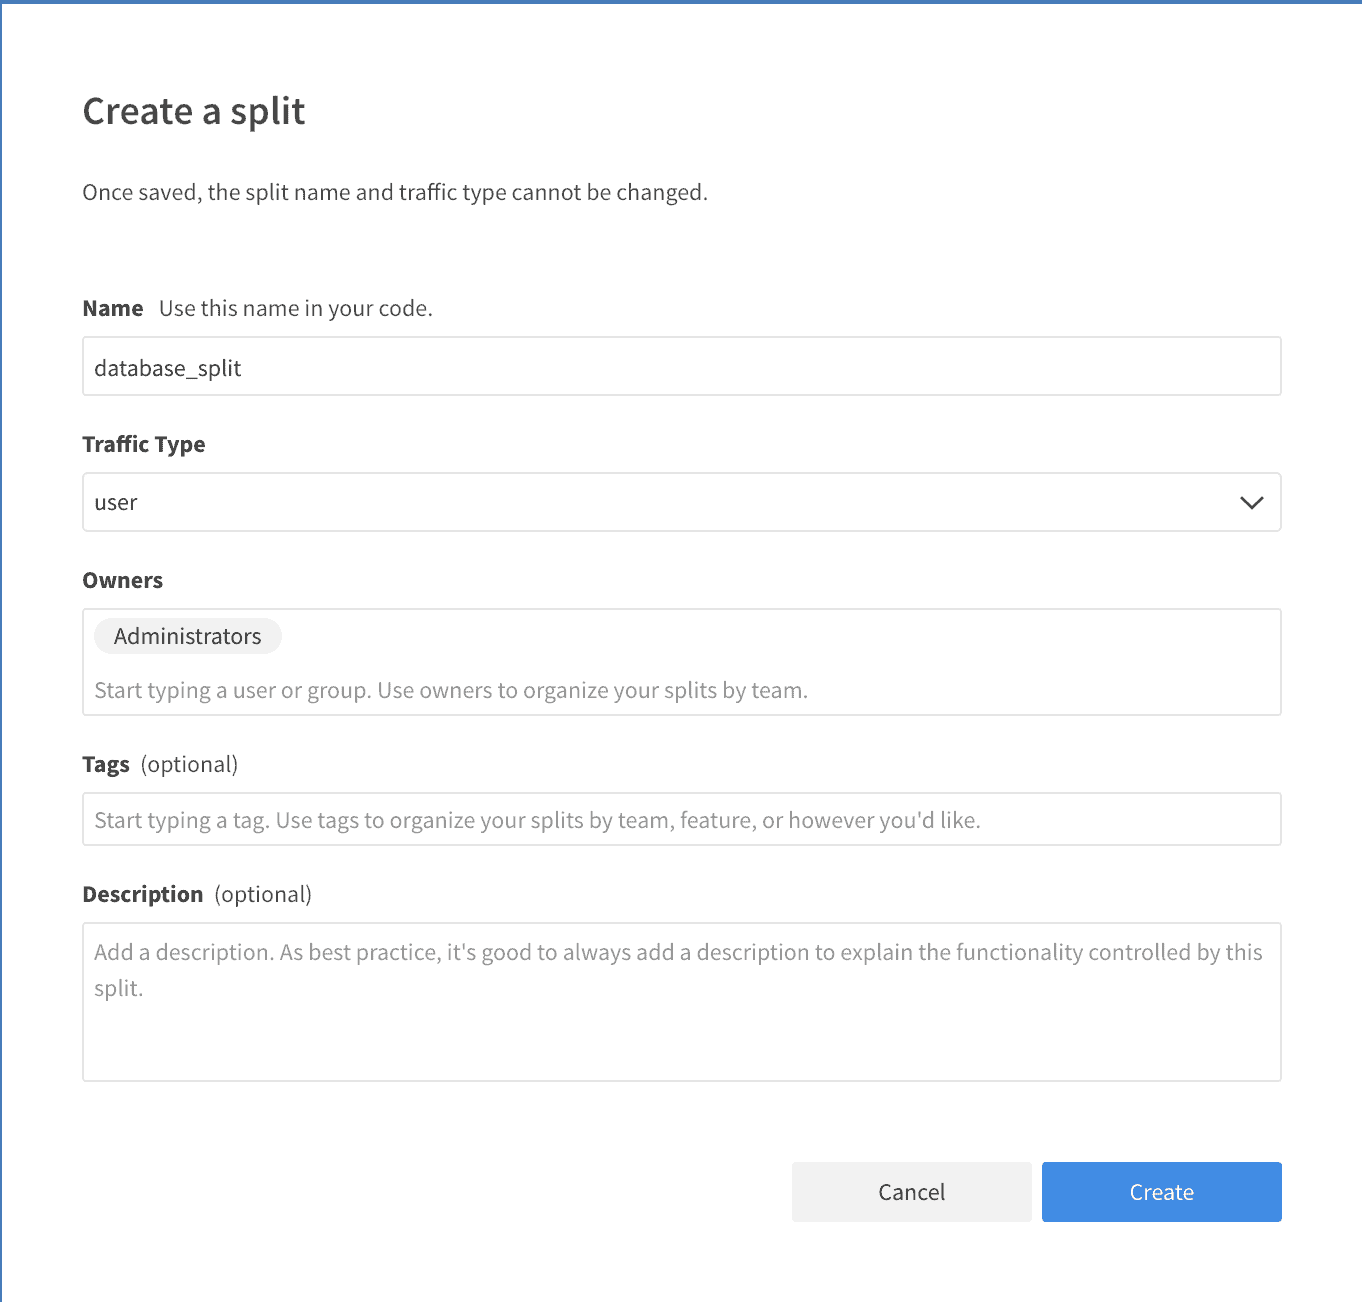
After you log in to Split, navigate to the Splits section on the left, and click Create Split. The dialog will prompt you for the split’s name, which you can define as database_split. Leave the default settings for everything else, and you’re good to go. Click Create to finish.
After successful creation, this is what you’ll see:
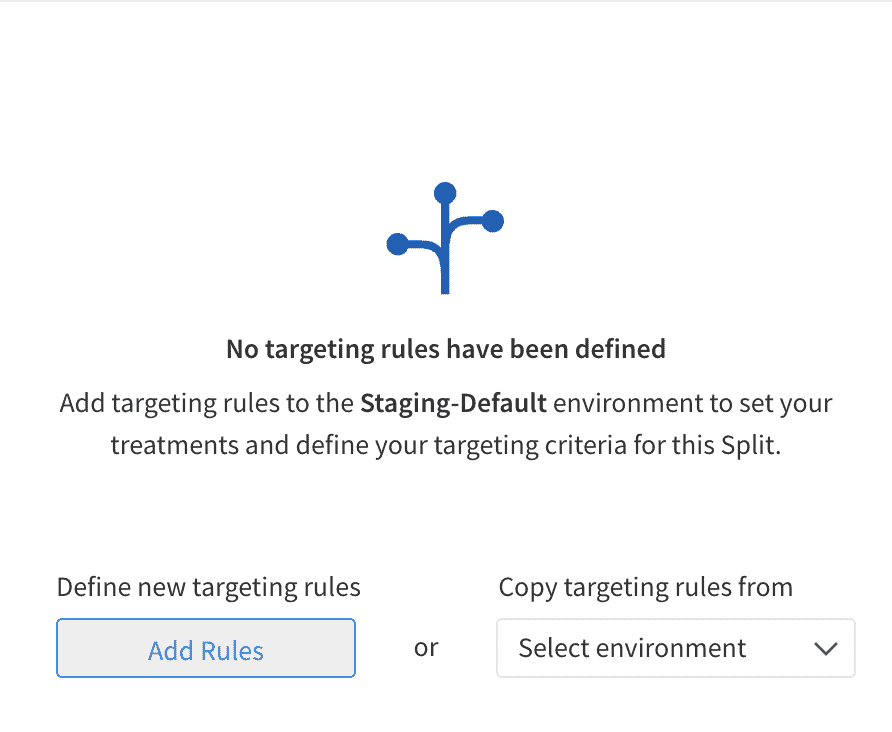
To configure the split settings, click Add Rules.
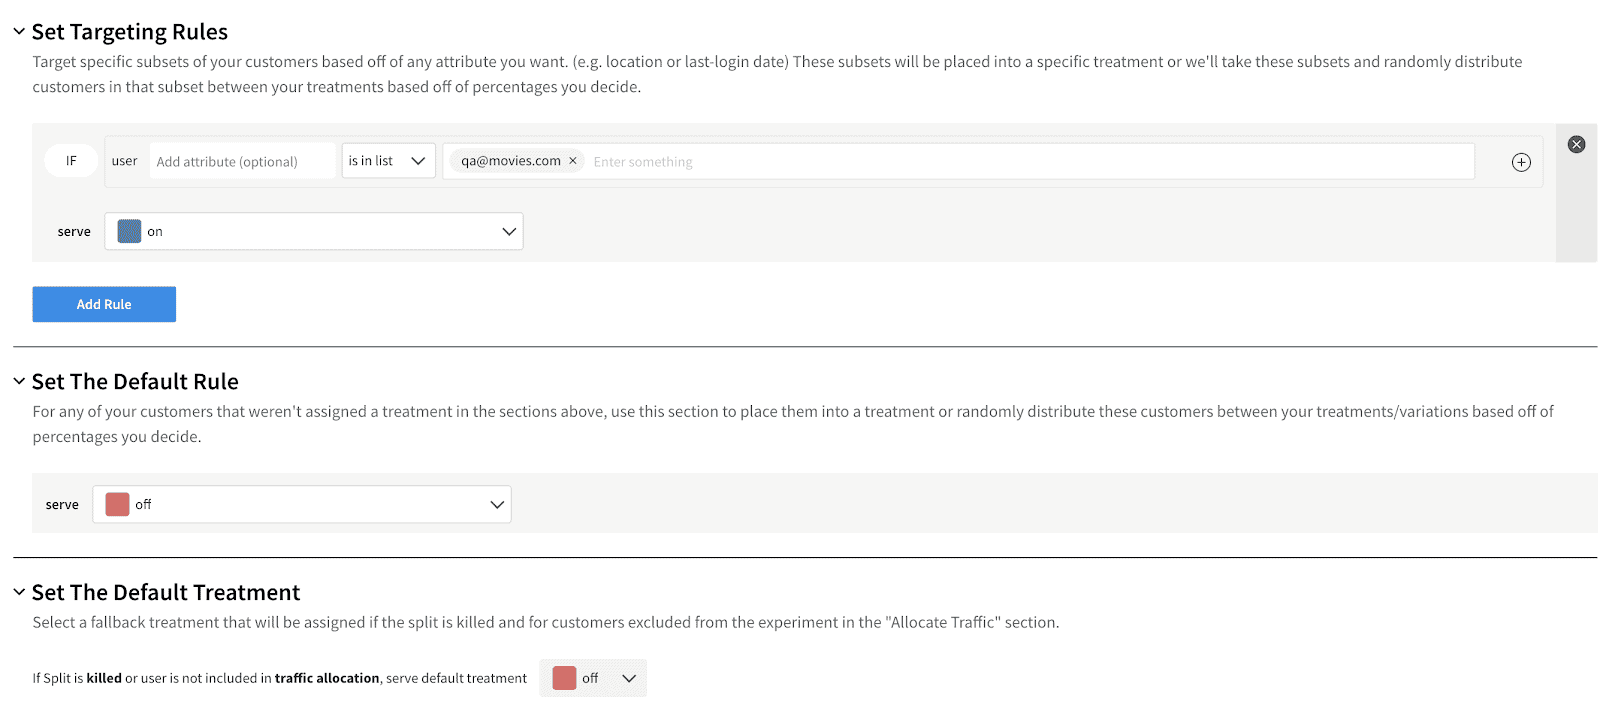
Possible states of feature flags in Split are called treatments. The most common values for treatments are on or off, but you can use any other value. In your case, when the treatment is on, the routes that the user hits will connect to the database, and if it’s off they’ll return the initial (mocked) state of the running application.

The next thing to set up are the targeting rules, where you’ll define who will be targeted inside your feature flag. As shown in the picture, this configuration will get the on treatment for all users that represent themselves as qa@movies.com. Everybody else will get the off treatment, configured in the Set The Default Rule section.
If, for some reason, your split isn’t active in the application at all, users will branch according to what you’ve set up inside the Set The Default Treatment section. A good practice is to have off treatment as the default one, as you don’t want untested features to accidentally be made accessible. |
Click Save changes, and then Confirm, to save your settings in Split.
To use feature flags in your Node.js application, Split’s Node.js SDK is required. It can be installed via npm:
npm i @splitsoftware/splitioCode language: CSS (css)Add the following code in the app.js:
const SplitFactory = require('@splitsoftware/splitio').SplitFactory;

const factory = SplitFactory({
  core: {
    authorizationKey: 'YOUR_API_KEY'
  }
});

const client = factory.client();Code language: JavaScript (javascript)
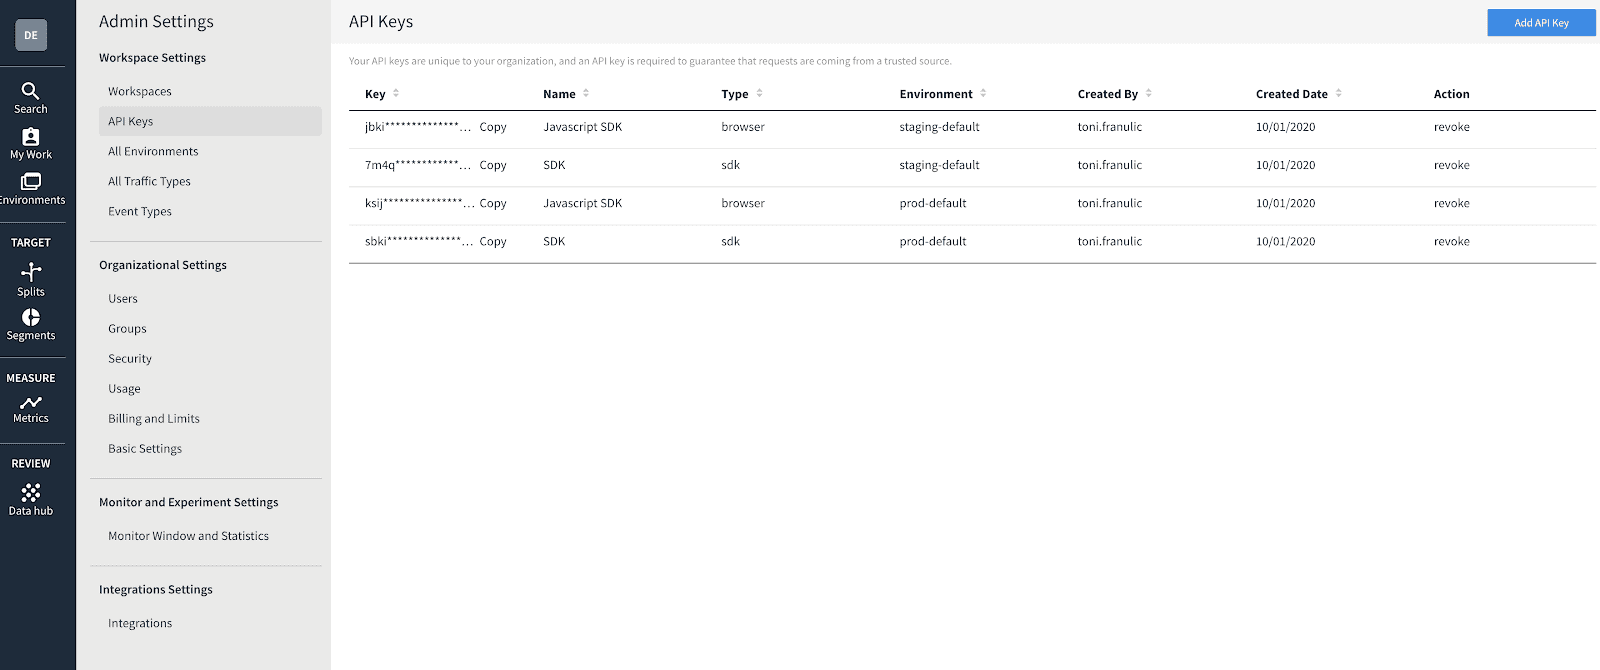
Note that the API key to use here is the one you can see in the Admin Settings of the Split dashboard, as pictured below. The key you’ll search for is a staging one for the SDK, the second one from the list on the image below. Of course, it would be good to store this API key inside an environment variable in a production app.
With the SDK plugged in, you can utilize it to get a respective treatment for a user’s request through an exposed method called getTreatment. Inside app.js, you’ll write a function named treatmentMiddleware that calculates the treatment using getTreatment, by passing the user’s email to it. Email is read from the authorization header that comes with every request and then evaluated in the context of a targeting rule you previously configured inside the Split app. Note how the second argument of the getTreatment method is your split’s name (database_split).
const treatmentMiddleware = function (request, response, next) {
  const userEmail = request.headers['authorization'];
  request.treatment = client.getTreatment(userEmail, 'database_split');
  next();
};Code language: JavaScript (javascript)
The purpose of the treatmentMiddleware is to put the treatment on the request object and proceed to the next middleware, which is the endpoint function defined inside api.js, by next() invocation. This is how the routing now looks, with a new middleware added:
app.get('/horrors/', treatmentMiddleware, api.getAllHorrors);
app.get('/horrors/:id', treatmentMiddleware, api.getHorrorById);
app.post('/horrors/', treatmentMiddleware, api.addHorror);
app.put('/horrors/:id', treatmentMiddleware, api.updateHorror);
app.delete('/horrors/:id', treatmentMiddleware, api.deleteHorror);Code language: C# (cs)
For a production app, you’d want to have some kind of authentication mechanism to identify your users, but here we are just sending the user’s email as the authorization header of each request. |
Now it’s time to connect to a database and use this treatment logic for branching.
Postgres, Meet Node
With the local database working properly, it’s time to wire up your app. What comes in handy here is the node-postgres package or pg, which provides a communication layer to Postgres databases from the Node environment. It’s installed via npm, from the root project directory:
npm i pgCode language: Matlab (matlab)The Node.js application isn’t aware of a database existing in the system or a database server running on your machine unless you provide connection data with credentials. In the api.js you can set that exact configuration at the top:
const Pool = require('pg').Pool;

const pool = new Pool({
  user: 'moviefan',
  host: 'localhost',
  database: 'movies',
  password: 'password',
  port: 5432
});Code language: JavaScript (javascript)
pg exposes a database connection Pool class. A new instance of the class, or new connection, if you will, is created by passing the configuration object to its constructor. Here you’ll recognize the data we’ve set recently, with 5432 being the default value for port. Now you’ll be able to use the connection pool instance to communicate with the database inside your endpoints.
| In a production-ready application, database credentials present a sensitive piece of data that you’d want to keep away from the source code and store instead on the server machine itself as environment variables. |
Add Route Branching with Feature Flags
Let’s now rework your endpoints inside api.js to have different branches, i.e., different responses according to the treatment the user is getting. If a user gets an on treatment, getAllHorrors will now return all the horror movies from the database, sorted by rating and in ascending order. And for all other cases (either an off treatment or no split in play at all), it will return the hardcoded data as before.
const getAllHorrors = async (request, response) => {
    if (request.treatment == 'on') {
      pool.query('SELECT * FROM horrors ORDER BY rating ASC', (error, results) => {
        response.status(200).json(results.rows);
      });
    } else {
      response.status(200).json(inMemoryHorrors);
    }
};Code language: PHP (php)
The query method inside the pool object gives you the ability to utilize raw SQL, as seen here. Of course, raw SQL isn’t the only way to write your queries inside the Node.js ecosystem, as you can use query builders like Knex.js or an ORM like Sequelize. |
Similarly, you can rework all other endpoints with treatment dependent branching as well. Note that the else if (request.treatment == 'off') block is omitted, as the same response is sent if the treatment is off, but also if the treatment has any other value.
const getHorrorById = (request, response) => {
    const id = parseInt(request.params.id);
    if (request.treatment == 'on') {
        pool.query('SELECT * FROM horrors WHERE id = $1', [id], (error, results) => {
            response.status(200).json(results.rows);
        });
    } else {
        response.status(200).json(inMemoryHorrors[0]);
    }
};

const addHorror = async (request, response) => {
    const { name, rating } = request.body;
    if (request.treatment == 'on') {
        pool.query('INSERT INTO horrors (name, rating) VALUES ($1, $2)', [name, rating], (error, results) => {
            response.status(201).send(`Horror added successfully.`);
        });
    } else {
        inMemoryHorrors.push({ name, rating });
        response.status(201).send(`Horror added successfully.`);
    }
};

const updateHorror = (request, response) => {
    const id = parseInt(request.params.id);
    const { name, rating } = request.body;

    if (request.treatment == 'on') {
        pool.query('UPDATE horrors SET name = $1, rating = $2 WHERE id = $3', [name, rating, id], (error, results) => {
            response.status(200).send(`Horror with id ${id} modified.`);
        });
    } else {
        inMemoryHorrors[0] = { name, rating };
        response.status(200).send(`Horror with id ${id} modified.`);
    }
};

const deleteHorror = (request, response) => {
    const id = parseInt(request.params.id);

    if (request.treatment == 'on') {
        pool.query('DELETE FROM horrors WHERE id = $1', [id], (error, results) => {
            response.status(200).send(`Horror with id ${id} deleted.`);
        });
    } else {
        inMemoryHorrors.shift();
        response.status(200).send(`Horror with id ${id} deleted.`);
    }
};Code language: JavaScript (javascript)
You should now test all of these scenarios to ensure everything is put together correctly. Let’s try to fetch all our horror movies with curl. You’ll introduce yourself as qa@movies.com user by putting that email in the authorization header in the first attempt.
curl http://localhost:5000/horrors -H "authorization:qa@movies.com"Code language: Elixir (elixir)As this request hits the on treatment branch due to the given email in the header, here is the response that you should be getting if you populated the database with the same data as in the tutorial:
[{"id":3,"name":"The Nightmare On Elm Street","rating":"8.2"},{"id":1,"name":"The Ring","rating":"8.6"},{"id":2,"name":"The Exorcist","rating":"8.8"}]Code language: JSON / JSON with Comments (json)On the other hand, the same request without a header fetches you the hardcoded in-memory list of horror movies, as it targets the off treatment:
curl http://localhost:5000/horrorsCode language: Arduino (arduino)Here is the example of the authorized create request, which adds a new horror movie to the database. content-type header also needs to be added to the request, as you send the body of application/json type.
curl http://localhost:5000/horrors -d '{"name":"The Last House On The Left","rating":"5.6"}' -H "authorization:qa@movies.com" -H "content-type:application/json"Code language: Gherkin (gherkin)And now, let’s hit the getHorrorById route, but with a slightly different header:
curl http://localhost:5000/horrors/1 -H "authorization:user@movies.com"Code language: Bash (bash)Note how this didn’t return the The Ring from the database (the one with the id of 1), as it didn’t hit the database. It returned the first horror movie from your hardcoded list, as the email user@movies.com isn’t listed in the split’s targeting rule, resulting in off treatment. Up next, few more examples that hit update and delete endpoints, respectively, both branching inside the on treatment, thanks to expected authorization:
curl -X PUT http://localhost:5000/horrors/1 -d '{"name":"The Ring","rating":"7.6"}' -H "authorization:qa@movies.com" -H "content-type:application/json"Code language: Gherkin (gherkin)curl -X DELETE http://localhost:5000/horrors/1 -H "authorization:qa@movies.com"Code language: SQL (Structured Query Language) (sql)So, this is your branching example right there, alive and kicking! Feel free to experiment with other requests as well, trying to hit both treatments, with curl or any other REST client.
Extra Credit with PostgreSQL
You may have noticed that our hardcoded “database” has a float type value for the rating, but our PostgreSQL database returns a string type for the rating.
This is because the Postgres numeric type could be a larger value than will fit in a Javascript float.
But, we know that the rating maxes out at 10. So, you can set up a custom parser to ensure that the values get converted properly. Add this to the top of your app.js file:
const types = require('pg').types

types.setTypeParser(1700, function(val) {
  return parseFloat(val)
});Code language: JavaScript (javascript)
The 1700 is PostgreSQL type identifier for numeric type. Now, when you use curl to get all movies, you get a response where the ratings are floats again:
curl http://localhost:5000/horrors -H "authorization:qa@movies.com"
[{"id":3,"name":"The Nightmare On Elm Street","rating":8.2},{"id":1,"name":"The Ring","rating":8.6},{"id":2,"name":"The Exorcist","rating":8.8}]Code language: C# (cs)
Node and Postgres… Better with Feature Flags!
Feature flags just did for you what they’re made for – the ensured a safe transition to a new feature, without any risk of breaking anything. As you’re now sure that all endpoints work well with the database, there is no need to use the in-memory database anymore. As the last step, you can just delete all the parts directing requests to the pre-database application state. That means there is no need to inspect the request.treatment value anymore, as all requests will be sent to the database. However, you can leave the Split initialization logic in the app.js, as it can be used for some future branching case. This is how the api.js file will look in the end:
const Pool = require('pg').Pool;
const pool = new Pool({
  user: 'moviefan',
  host: 'localhost',
  database: 'movies',
  password: 'password',
  port: 5432
});

const getAllHorrors = async (request, response) => {
  pool.query('SELECT * FROM horrors ORDER BY rating ASC', (error, results) => {
    response.status(200).json(results.rows);
  });
};

const getHorrorById = (request, response) => {
  const id = parseInt(request.params.id);
  pool.query('SELECT * FROM horrors WHERE id = $1', [id], (error, results) => {
    response.status(200).json(results.rows);
  });
};

const addHorror = async (request, response) => {
  const { name, rating } = request.body;
  pool.query('INSERT INTO horrors (name, rating) VALUES ($1, $2)', [name, rating], (error, results) => {
    response.status(201).send(`Horror added successfully.`);
  });
};

const updateHorror = (request, response) => {
  const id = parseInt(request.params.id);
  const { name, rating } = request.body;
  pool.query(
    'UPDATE horrors SET name = $1, rating = $2 WHERE id = $3', [name, rating, id], (error, results) => {
      response.status(200).send(`Horror with id ${id} modified.`);
    }
  );
};

const deleteHorror = (request, response) => {
  const id = parseInt(request.params.id);
  pool.query('DELETE FROM horrors WHERE id = $1', [id], (error, results) => {
    response.status(200).send(`Horror with id ${id} deleted.`);
  });
};

module.exports = {
  getAllHorrors,
  getHorrorById,
  addHorror,
  updateHorror,
  deleteHorror
};Code language: JavaScript (javascript)
The Node Postgres example covered in this post is just one of the numerous ways to use feature flags inside the application’s development lifecycle. And in the real world, feature flags can significantly improve your deployment and delivery process.
Learn More About Node, Feature Flags, and Testing in Production
Congrats, you made it through the end, and hopefully, a happy one, unlike in some of the movie titles we mentioned above. I’m glad I could help you learn something new about Node and Postgres and get a perspective on feature flags and how to use them. If you’d like to dive deeper on some of the topics and technologies covered in this post, I’d encourage you to check out these resources:
- Testing a Feature-Flagged Change
- Migrate from Monolith to Microservices
- Get Started with Feature Flags in Node
- How to Implement Testing in Production
- 7 Ways we Use Feature Flags Every Day at Split
And as always, we’d love to have you follow along and catch all our latest content on Twitter, Facebook, and YouTube!
Get Split Certified
Split Arcade includes product explainer videos, clickable product tutorials, manipulatable code examples, and interactive challenges.
Deliver Features That Matter, Faster. And Exhale.
Split is a feature management platform that attributes insightful data to everything you release. Whether your team is looking to test in production, perform gradual rollouts, or experiment with new features–Split ensures your efforts are safe, visible, and highly impactful. What a Release. Get going with a free account, schedule a demo to learn more, or contact us for further questions and support.
