
Today you’re going to build a simple Spring Boot web app and see how you can easily use feature flags to change functionality. For this tutorial, we’re going to create a basic weather application. In fact, it’s so basic that it only tells you the weather in Detroit, Michigan! But don’t worry, after your fifteen minutes are up, you’ll find yourself wanting to add additional features and functionality.
We’ll begin by getting started with Split plus a free weather API. Then we’ll create the scaffolding for our app using Spring Initializer. And then, we’ll add two implementations to our weather app and learn how to switch between the two using Split.io treatments.
Deploy Continuously with Confidence – Sign up for a Split demo!

Add API and SDK Dependencies for Your Spring Boot App
First, let’s get some prerequisites out of the way. We’ll need to get a couple of accounts set up, so we’re ready to roll with our new Spring Boot application.
Split Java SDK
For today’s weather app, you’re going to use Split’s Java SDK. For that, you’ll need a Split account and an SDK key. Sign up for a free Split account and get your API key.

To find your API key, head over to your Split dashboard, click on the workspace button on the top left. Then go to Admin Settings and click on API Keys.
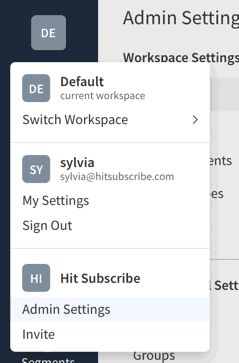
There you’ll see keys for each environment and type of key. For today’s demo, we’ll be using the API key for an SDK in staging.

Open Weather Map API
Next, let’s get an API key from Open Weather Map. You’ll be using their API to get the current weather for our simple weather app. Later on, when you’re adding additional features to your weather app, you can come back here to see what other useful weather APIs they have available. We’ll be using the Current Weather Data API they have available for free.
Once you have your API key, you’ll be able to test feature functionality by doing a GET call on the following URL.
http://api.openweathermap.org/data/2.5/weather?q={city},{country}&APPID={apiKey}&units=imperial
Create Base App Using Spring Initializr
Next, let’s create a basic Spring Boot web app using the Spring Initializr.
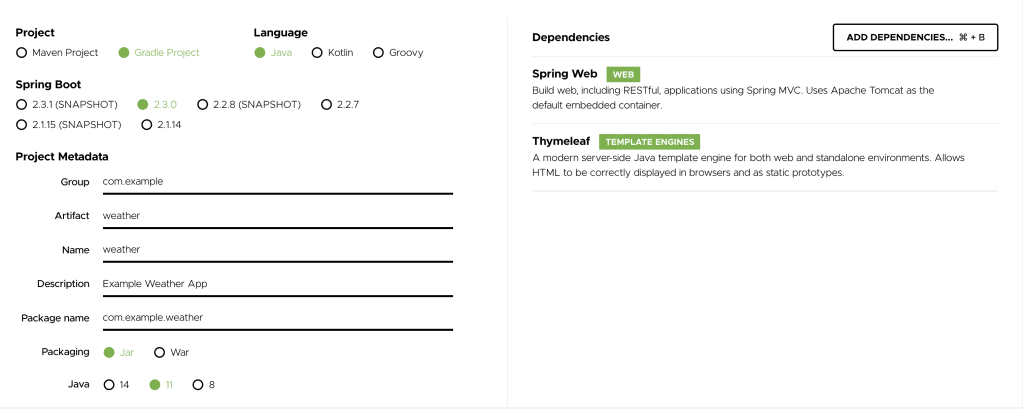
To start, create a basic Spring Web application and include Thymeleaf for rendering your data in HTML.
In the Spring Initializr UI, select the following options.
- Project: Gradle Project. In this post, I’m using Gradle, but you’re welcome to use Maven if you’re more comfortable with that.
- Language: Java. Let’s stick with our old favorite Java for our weather app.
- Spring Boot: 2.3.0.
- Project Metadata: Fill this in however you like. It will create our package structure and artifact name based on what we put here.
- Java Version: I’ve chosen version 11, but you’re free to select any available options.
- Dependencies: I’ve pulled in Spring Web and Thymeleaf to start with, though we’ll add a few more dependencies in just a minute.
Once you have everything selected, you can download a zip file with your application. Next, unzip the file into your regular workspace and import the project folder into your favorite IDE. Today I’m using Intellij, but you’re free to use whatever you’re used to.
Once you’ve imported the project, you should have a directory structure.
As usual, all our Java files will live in the Java folder. And our Thymeleaf template page will go into the templates folder under resources.
Now, you have one more dependency to add before you can start coding. Let’s add the Split SDK to start using feature flags. We’ll do this by adding the following line to our build.gradle file.
implementation 'io.split.client:java-client:3.3.3'Code language: Delphi (delphi)Once you’ve got your application imported, initiate a build of the project, and run the app to make sure everything is ready to go. I typically run this from the command line, but you can also run a build in your IDE.
./gradlew build bootRun
If you don’t see any errors, you’re in good shape and can move on to the next step.
So now that we’re ready let’s dive further into our application.
Add a Page for Current Weather in Your Spring Boot App
First, create a basic HTML page that will display the weather. You can name this file current-weather.html and put it in the resources/templates folder that was created earlier.
<!DOCTYPE html>
<html lang="en" xmlns:th="http://www.thymeleaf.org">
<head>
<meta charset="UTF-8">
<title>Current Weather</title>
</head>
<body>
<div>
<h3>Current Conditions</h3>
<p th:text="${currentWeather.description}">Description</p>
<h3>Temperature</h3>
<p th:text="${currentWeather.temperature} + ' ℉'">Temperature</p>
<h3>Feels Like</h3>
<p th:text="${currentWeather.feelsLike} + ' ℉'">Feels Like</p>
<h3>Wind Speed</h3>
<p th:text="${currentWeather.windSpeed} + ' mph'"></p>
</div>
</body>
</html>Code language: Django (django)This Thymeleaf template will take the current weather loaded into a POJO and display it on a page.
What you’ve done here is code a very simple div that includes some headers and data that will display the current weather. I’ve included the description, the current temperature, the “feels like” temperature in Fahrenheit, and the wind speed in miles per hour. If you’re feeling the need to go metric, you can do that later. But for now, embrace the beauty of these imperial units!
Create a Controller in Spring Boot
Next, you’ll need to get the weather data from somewhere. For your first pass, hard code some values to make sure you have everything wired up correctly.
Now, I know most of you are going to want to use a @RestController, but with Thymeleaf, it’s easier to configure using a basic Spring @Controller annotation. The code below will add your current weather object to the Spring Model, allowing the front end to render the values. For the return statement, you’ll want to return the string current-weather to tie it to the HTML page created earlier.
@Controller
public class CurrentWeatherController {
    @GetMapping("/current-weather")
    public String getCurrentWeather(Model model) {
        CurrentWeather currentWeather = new CurrentWeather("Clear", BigDecimal.ONE, BigDecimal.ZERO, BigDecimal.TEN);
        model.addAttribute("currentWeather", currentWeather);
        return "current-weather";
    }
}Code language: Java (java)
Then the CurrentWeather POJO looks like the following code snippet, but you will also want to auto-generate the getters, constructor, equals, and hashcode.
public class CurrentWeather implements Serializable {

    private String description;
    private BigDecimal temperature;
    private BigDecimal feelsLike;
    private BigDecimal windSpeed;

// boilerplate getters, constructors, equals, and hashcode omitted
}Code language: Java (java)
At this point, I would recommend taking a quick pause to build and run your application to make sure everything works as expected. Even for simple fifteen-minute apps, we want to add functionality iteratively so we can find errors quickly.
./gradlew build bootRun
Now point your browser to http://localhost:8080/current-weather to verify everything works correctly.
If you’re still in a good spot, let’s move on. Next, you’re going to start building out new functionality that will eventually use a feature flag. One great way of using feature flags includes switching between different implementations. In this case, you’re going to have a stub weather service that returns the stub CurrentWeather POJO that you used previously. And then, the live weather service will use our Open Weather Map APIs to get the actual weather. And our first implementation will include just using a hard-coded boolean to switch between the two as you’re writing and testing features locally.
@Controller
public class CurrentWeatherController {

    private final StubWeatherService stubWeatherService;
    private final LiveWeatherService liveWeatherService;

    public CurrentWeatherController(StubWeatherService stubWeatherService, LiveWeatherService liveWeatherService) {
        this.stubWeatherService = stubWeatherService;
        this.liveWeatherService = liveWeatherService;
    }

    @GetMapping("/current-weather")
    public String getCurrentWeather(Model model) {
        if (true) {
            model.addAttribute("currentWeather", liveWeatherService.getCurrentWeather("Detroit","us"));
        } else {
            model.addAttribute("currentWeather", stubWeatherService.getCurrentWeather("Detroit","us"));
        }
        return "current-weather";
    }
}Code language: Java (java)
As you can see, the stub weather service returns the hardcoded values.
@Service
public class StubWeatherService {

    public CurrentWeather getCurrentWeather(String city, String country) {
        return new CurrentWeather("Clear", BigDecimal.ONE, BigDecimal.ZERO, BigDecimal.TEN);
    }
}Code language: Arduino (arduino)
And next, add a live weather service that will make a call to the external weather API.
@Service
public class LiveWeatherService {

    private static final String WEATHER_URL = "http://api.openweathermap.org/data/2.5/weather?q={city},{country}&APPID={key}&units=metric";

    @Value("${api.openweathermap.key}")
    private String apiKey;

    private final RestTemplate restTemplate;
    private final ObjectMapper objectMapper;

    public LiveWeatherService(RestTemplateBuilder restTemplateBuilder, ObjectMapper objectMapper) {
        this.restTemplate = restTemplateBuilder.build();
        this.objectMapper = objectMapper;
    }

    public CurrentWeather getCurrentWeather(String city, String country) {
        URI url = new UriTemplate(WEATHER_URL).expand(city, country, apiKey);
        ResponseEntity<String> response = restTemplate.getForEntity(url, String.class);

        return convert(response);
    }

    private CurrentWeather convert(ResponseEntity<String> response) {
        try {
            JsonNode root = objectMapper.readTree(response.getBody());
            return new CurrentWeather(root.path("weather").get(0).path("main").asText(),
                    BigDecimal.valueOf(root.path("main").path("temp").asDouble()),
                    BigDecimal.valueOf(root.path("main").path("feels_like").asDouble()),
                    BigDecimal.valueOf(root.path("wind").path("speed").asDouble()));
        } catch (JsonProcessingException e) {
            throw new RuntimeException("Error parsing JSON", e);
        }
    }
}Code language: Arduino (arduino)
In the live service, you can hard code your API key for now, just like I’ve hard-coded the URL. I’ve moved my API key into a properties file, so I don’t accidentally check it into GitHub. As you can see, I’m making a REST call to the Open Weather Map API and then using Jackson’s ObjectMapper to do a quick and dirty translation of their response to my CurrentWeather POJO.
Also, I’ve added a config class that defines my RestTemplate.
@Configuration
public class WeatherApplicationConfig {
    @Bean
    public RestTemplate restTemplate(RestTemplateBuilder restTemplateBuilder) {
        return restTemplateBuilder.build();
    }
}Code language: Java (java)
Next, take a moment to rerun the app to make sure everything looks good. Currently, the weather in Detroit makes me want to go outside!
So being able to switch back and forth seems nice, but how can you make this more dynamic? And how can you switch between implementations on the fly? That’s where Split comes in.
Integrate Split to Switch Between Fake and Live Weather
First, using the API key you received when signing up, create a configuration file where you instantiate your SplitClient. Again, we’ll be using our SDK API key for staging. In the sample below, I’ve pulled my API key and endpoints out of my properties file to keep things separate. And I’ve added this to my WeatherApplicationConfig that we created earlier.
@Configuration
public class WeatherApplicationConfig {
    @Value("${split.io.api.key}")
    private String splitApiKey;

    @Bean
    public SplitClient splitClient() throws Exception {
        SplitClientConfig config = SplitClientConfig.builder()
                .setBlockUntilReadyTimeout(10000)
            	.enableDebug()
            	.build();

        SplitFactory splitFactory = SplitFactoryBuilder.build(splitApiKey, config);
        SplitClient client = splitFactory.client();
        client.blockUntilReady();

        return client;
    }
}Code language: Java (java)
Next, create a split wrapper so that you can hide some of the implementation code and reduce duplication whenever you use a Split treatment.
@Component
public class SplitWrapper {
    @Value("${split.io.api.key}")
    private String splitApiKey;

    private final SplitClient splitClient;
    public SplitWrapper(SplitClient splitClient) {
        this.splitClient = splitClient;
    }

    public boolean isTreatmentOn(String treatmentName) {
        String treatment = splitClient.getTreatment(splitApiKey, treatmentName);
        if (treatment.equals("on")) {
        	return true;
        } else if (treatment.equals("off")) {
        	return false;
        } else {
        	throw new RuntimeException("Error retrieving treatment from Split.io");
        }
    }
}Code language: Arduino (arduino)
And then, update the CurrentWeatherController to use the SplitWrapper to decide whether you want the stub weather returned or the real thing.
@Controller
public class CurrentWeatherController {

    private final StubWeatherService stubWeatherService;
    private final LiveWeatherService liveWeatherService;
    private final SplitWrapper splitWrapper;

    public CurrentWeatherController(StubWeatherService stubWeatherService, LiveWeatherService liveWeatherService, SplitWrapper splitWrapper) {
        this.stubWeatherService = stubWeatherService;
        this.liveWeatherService = liveWeatherService;
        this.splitWrapper = splitWrapper;
    }

    @GetMapping("/current-weather")
    public String getCurrentWeather(Model model) {
        if (splitWrapper.isTreatmentOn("live-weather")) {
            model.addAttribute("currentWeather", liveWeatherService.getCurrentWeather("Detroit","us"));
        } else {
            model.addAttribute("currentWeather", stubWeatherService.getCurrentWeather("Detroit","us"));
        }
        return "current-weather";
    }
}Code language: Java (java)
And there it is. Now you’ve got the base for what could be a fun weather app.
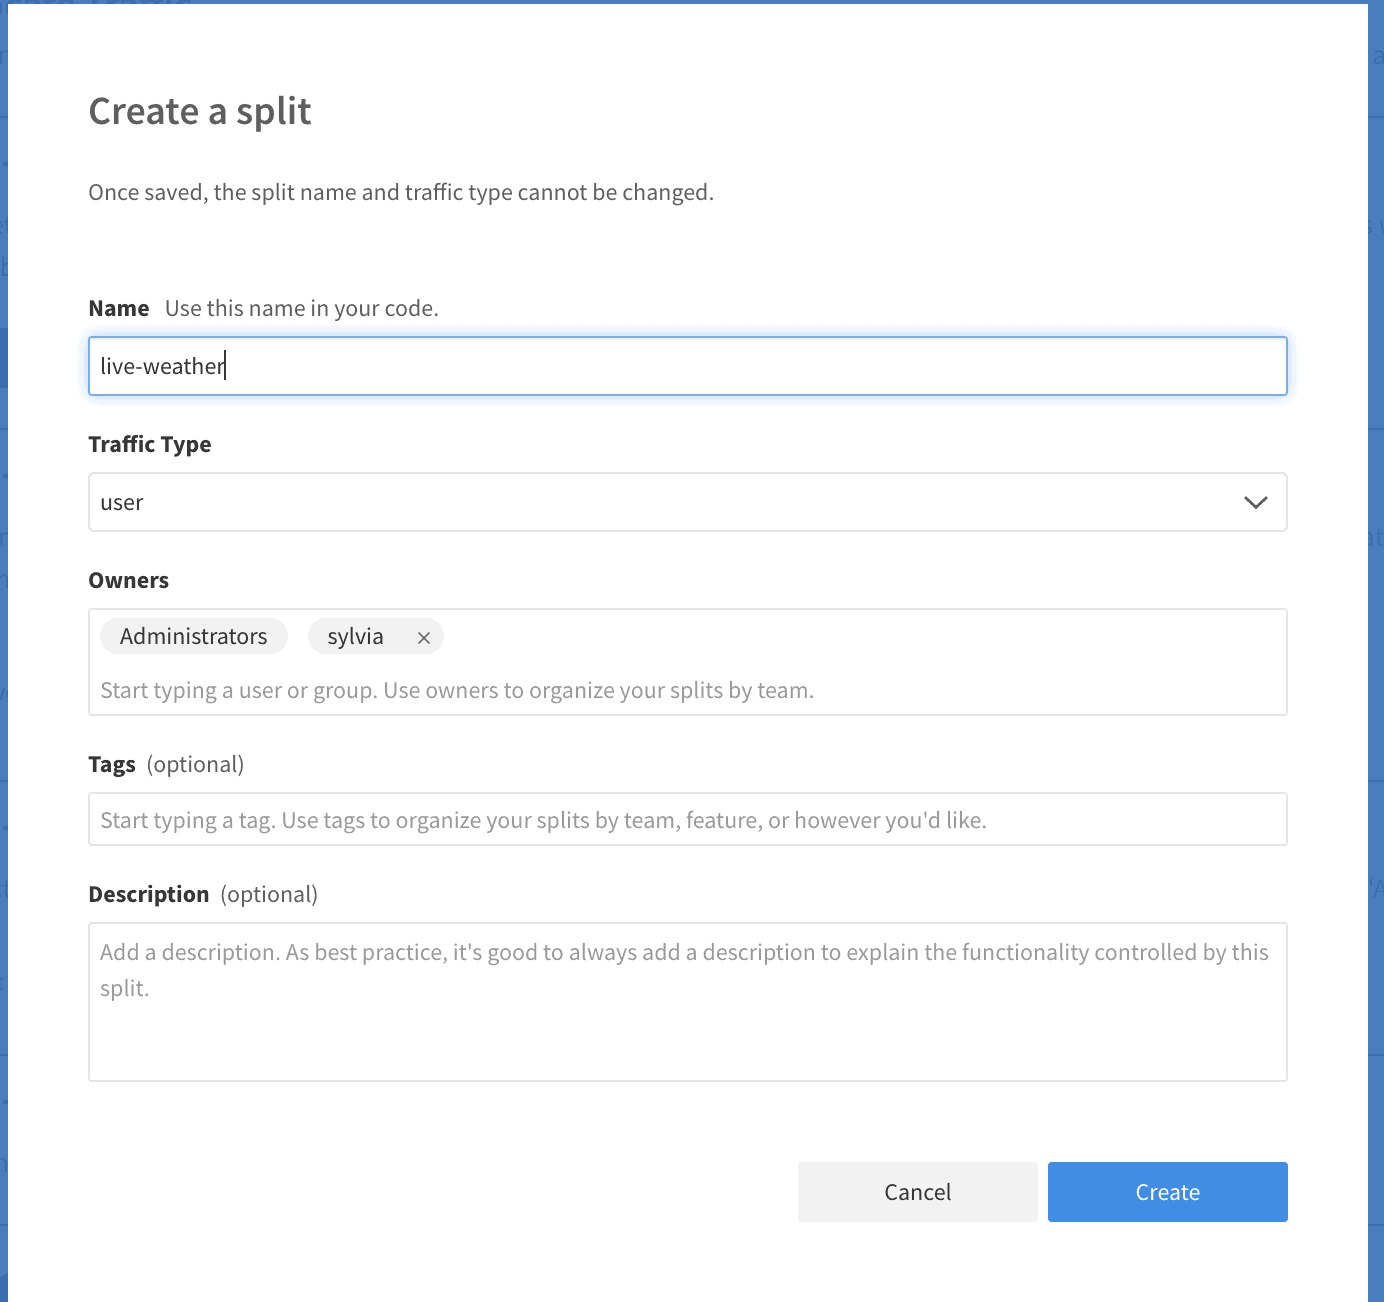
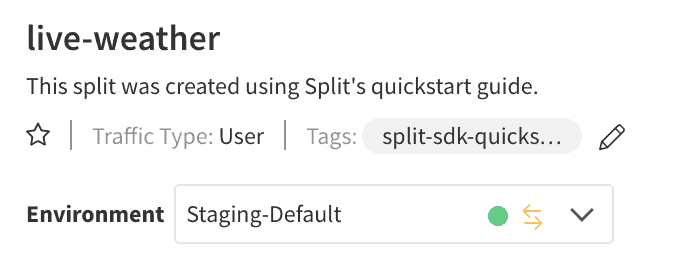
Create Your Split
Before you head out of here today, you’ll want to set up a treatment in Split.io for the live-weather flag. And then you’ll have everything wired together.
When you first create a feature flag in our Split.io dashboard, all you need is the name.
Then we’ll move to adding a basic rule to our split.
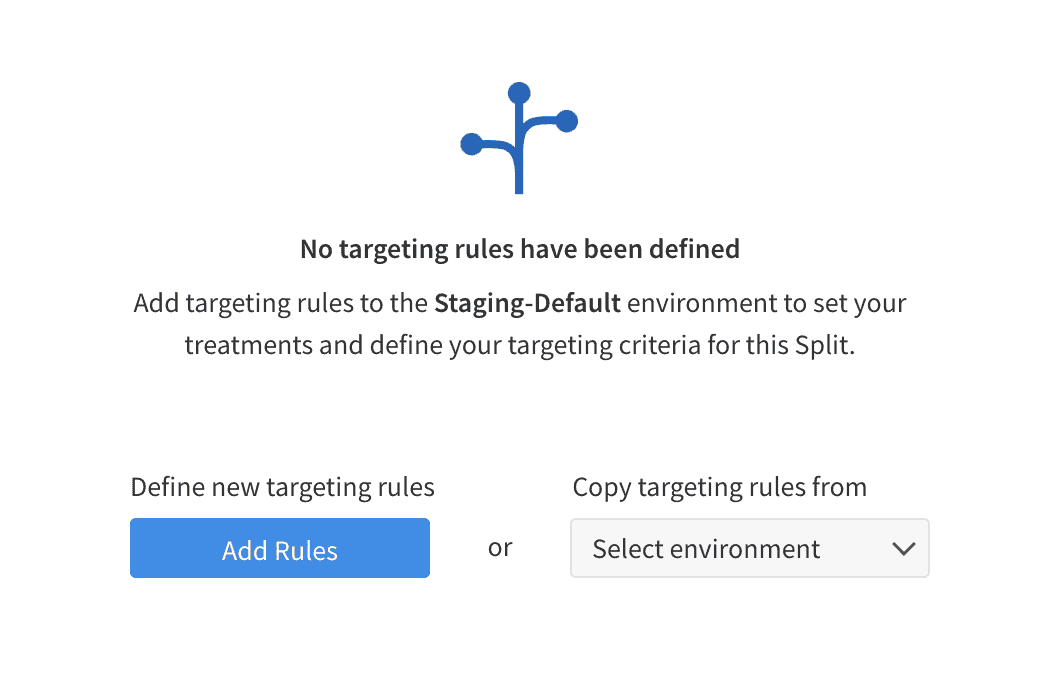
After clicking on Add Rules, you’ll be able to add a rule to either production or staging. When creating your rule, make sure your environment is set to staging, as that’s the API key we’re using.
When you create a split, the default returns control, which means the rule hasn’t been activated. Once you create a rule, it defaults everything to the off setting.
So now that you’ve created your split when you run your app, you’ll see the hard-coded weather. This demonstrates that the setting on any newly created split will be “off.” This lets you create flags and include them for new features quickly, without having to worry about introducing new or unfinished functionality prematurely.

But now turn this feature on for everyone and save the change. Then you can watch the web app switch over to showing live traffic just by hitting refresh on your screen!

Congrats! You’ve completed a quick Spring Boot web app and incorporated a feature flag using Split.io! What should you do next?
Extra Credit
Now that you have a basic app, we can begin to build on it. Take a look at some of these ideas to add next.
- Add input fields so that you can see the weather somewhere other than Detroit
- Create unit tests to validate the functionality you’ve built
- Configure advanced split treatments that cover whitelists and targeting rules
- Add metrics to help monitor your application
- Use more feature flags to gain more insights:
- Find out if your customers prefer metric or imperial measurements?
- Determine if your customers find one weather API more accurate or favorable than another. Add additional sources for your weather and see which your customers prefer.
- Start adding styling and layouts to your UI and test features on different customers.
Though this app provides some basic feature flag functionality, it hopefully opened your eyes to other potential uses in your applications.
Learn More about Spring Boot and Feature Flags
Interested in digging deeper on A/B Testing Features and Experimentation? We’ve got you covered:
- Learn about more about A/B testing and A/B/n testing
- Dig deeper into Multivariate testing
- And finally, check out the state of feature delivery in 2020
As always, if you’re looking for more great content like this, we’d love to have you follow us on Twitter @splitsoftware, and subscribe to our YouTube channel.
Get Split Certified
Split Arcade includes product explainer videos, clickable product tutorials, manipulatable code examples, and interactive challenges.
Deliver Features That Matter, Faster. And Exhale.
Split is a feature management platform that attributes insightful data to everything you release. Whether your team is looking to test in production, perform gradual rollouts, or experiment with new features–Split ensures your efforts are safe, visible, and highly impactful. What a Release. Get going with a free account, schedule a demo to learn more, or contact us for more information.