
Feature toggling is a powerful technique you can use to hide or disable parts of an application. Today, we’ll walk you through implementing a feature toggle (often called a feature flag) in Spring Boot. By the end of the post, you’ll have learned not only how to get started with toggles in practice, but also what they are in the first place and why they’re so useful.
Let’s dig in.
Feature Toggles in Spring Boot: The Fundamentals
Let’s start with a brief overview of both the concept of feature toggles and the main ways to implement them in a Spring Boot app. Feature toggles—also called feature flags or feature switches, among other names—are mechanisms that allow you to hide or disable features in your application.
Some could argue for primitive techniques such as disabling a portion of the code by commenting it out or even using a conditional. However, that’s not enough in practice, as you’ll soon see.
Turning Features Off and On Without Redeploying Code Is Handy …
A key property of an actual feature toggle is that it enables you to turn features off and on without having to change and redeploy the code. This capability is amazingly useful in a variety of scenarios.
… To Enable A/B Testing
One of the processes facilitated by the adoption of feature toggling tools is A/B testing.
In a nutshell, A/B testing is a technique to test how users react to a given feature. If you split users into two groups and serve each group a different version of the feature, you can identify which version generates the best user response.
Since feature toggles allow you to enable and disable features, you might be able to leverage them to enable a given feature only to a specific group of users at a time.
… To Facilitate Canary Releases
Another technique that feature toggling tools make easier is the canary release, which is sometimes mistaken for A/B testing. However, they’re two distinct techniques.
A canary release is a partial release. That means that you deploy your app’s new version just to a subset of your users, instead of all of them. Then, you closely monitor that group and roll back the release if something goes wrong. That way, if the changes have a defect, only a small percentage of your user base will experience it.
You might still think that does sound a little bit like A/B testing. So what’s the difference?
It’s simple: while A/B is mainly used to see how users respond to a given feature, a canary release is a risk-mitigating technique.
Feature toggles help canary releases in pretty much the same way they do with A/B testing. As explained before, while the main differences between A/B testing and canaries are the intentions behind each technique, the mechanisms that allow each one are mostly the same.
Spring Boot Feature Toggles: The Practical Guide
It’s finally time to roll up your sleeves and learn how to implement your first feature toggle. Let’s start by installing some requirements.
The sample app you’re going to add a feature flag to is a web API. So you’re going to need a tool like Postman to send HTTP requests.
I’ll be using the free community version of IntelliJ IDEA as my IDE throughout the tutorial.
Your next step is obtaining your key for the Split’s Java SDK. Start by signing up for a free Split account, and then log in. You’ll see a DE button in the upper left corner, which is the workspace button. Click on it, and then click on Admin settings.
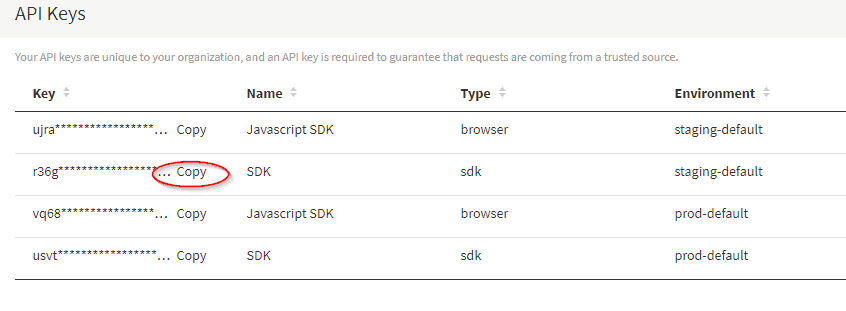
After that, click on API Keys in the left panel. You’ll see the available keys for all of your environments. For this guide, you’ll use an SDK key for the staging-default environment. Just click on Copy, and the key will be available in your clipboard.
Start Up the Sample App
The sample app for this tutorial is a web API that allows users to make reservations for a fictitious restaurant.
You can get it by going to this GitHub repo, either by cloning it or by downloading the code as a zip package. Save its contents to an easily accessible folder.
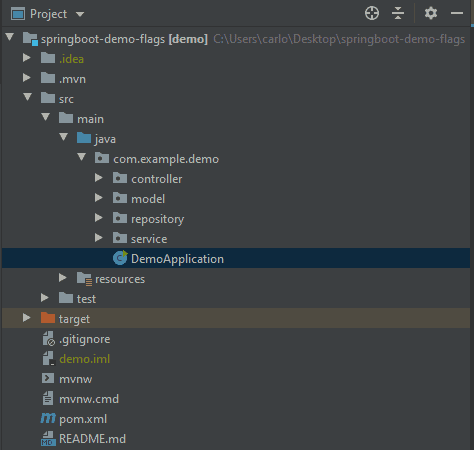
Then start IntelliJ IDEA. On the start screen, click on Open or Import. Then locate the folder containing the app’s source code. Select the pom.xml file and click OK. The IDE will ask you whether to open the pom.xml file as a project or as a regular file. Select Open as Project.
The project’s structure should look like this:
Open the DemoApplication class, and you’ll see two small play icons to the left of the code, one close to the class declaration and the other close to the method declaration. Click either one, and then click on Run > DemoApplication.main().
Finally, open your preferred browser, and go to localhost:8080/api/reservations. If everything went well, you should see something like this:
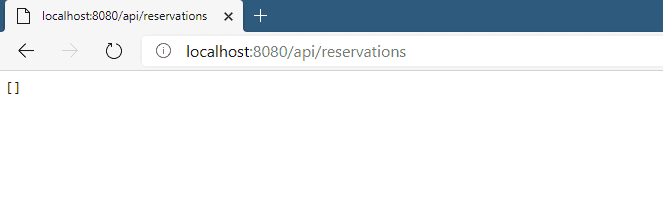
You’ve just sent a GET request to the app’s endpoint, which resulted in an empty array, since you still haven’t added any reservations.
Create Reservations
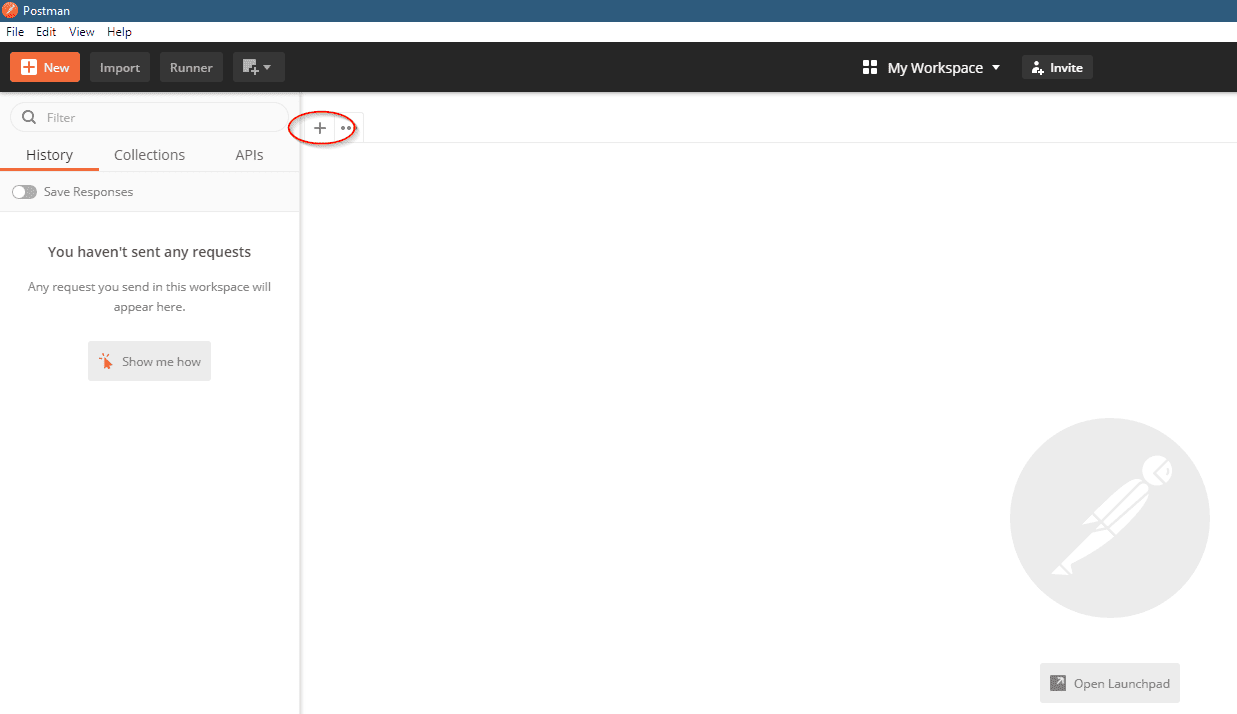
Open the Postman application, and click on the new request button:
Postman will add a tab containing a new request. Change its type to POST, and add http://localhost:8080/api/reservations as the request URL. In the request options, click on Body, select raw as the type, and finally select JSON as the format.
Now, paste the following content to the request box, and then click on Send:
{
"name": "Julien Hamilton",
"date": "2021-04-20",
"quantity": 4,
"email": "julien@example.com"
}Code language: JSON / JSON with Comments (json)If everything went OK, you should see the 201 Created status code being displayed right below the request box.
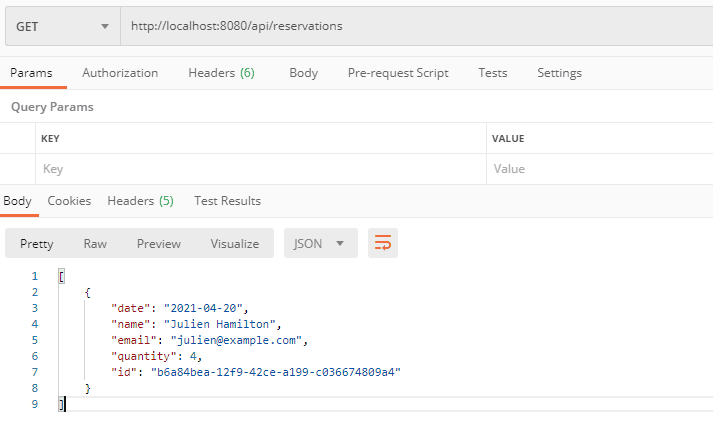
Now, create a GET request to retrieve the reservation you’ve just created. Click the new request button again, enter the same address as the request URL, and leave the type as GET. Click Send and you should see the response in the form of the same data you sent plus a GUID:
Enter the Need for a Feature Toggle
This API doesn’t implement many features a real application would. For instance, it doesn’t persist to a real database, storing the reservations in memory instead. Also, the number of seats available for each day is hard coded (as 40). A real-life application would allow that number to be configured via some external mechanism.
Another feature this app doesn’t have is a validation against creating reservations in the past. There’s nothing stopping us from adding a reservation to a date in, let’s say, 1995.
This is an important feature to have, so let’s implement it, using it as an opportunity to add a feature toggle to our application.
Time to Level Up: Use Split for Smarter Feature Toggle Management
The first thing you’ve got to do is add the Split SDK to the project. Since the app uses Maven, add the following to your pom.xml file, inside <dependencies>:
<dependency>
  <groupId>io.split.client</groupId>
  <artifactId>java-client</artifactId>
  <version>3.3.3</version>
</dependency>Code language: Django (django)
Wait for a few seconds while IntelliJ (through Maven) resolves the dependencies for the project. If that doesn’t work, try going to the Maven tab on Intellij IDEA and explicitly rebuilding the project. Then, try to build the application. If no errors happen, you’re ready to continue.
Change Your Code
Let’s now add the flag to the code. Right-click the com.example.demo package, go to New > Java class. Name the new class ReservationsAPIConfig. This is going to be a configuration class you’ll use to configure the bean for the Split client. Once the class is created, paste the following content in it:
@Configuration
public class ReservationsAPIConfig {

    @Value("#{ @environment['split.api.key] }")
    private String apiKey;

    @Bean
    public SplitClient splitClient() throws Exception {
        SplitClientConfig config = SplitClientConfig.builder()
            .setBlockUntilReadyTimeout(20000)
            .enableDebug()
            .build();

        SplitFactory splitFactory = SplitFactoryBuilder.build(apiToken, config);
        SplitClient client = splitFactory.client();
        client.blockUntilReady();

        return client;
    }
}Code language: Java (java)
In your src/main/resources folder, create a file called: application.yml and paste in the following:
split:
  api:
    key: <your split api key>Code language: Swift (swift)
Note: replace <your split api key> with the actual split api key you copied earlier.
For the next step, you’ll have to go to the ReservationController and change its constructor so it gets an instance of SplitClient as a second argument. You’ll also need to add a new private field of type SplitClient.
public ReservationController(ReservationService reservationService, SplitClient splitClient) {
   this.reservationService = reservationService;
   this.splitClient = splitClient;
}Code language: Arduino (arduino)
The controller now has access to a Split client and can use it to decide whether or not reservations with dates in the paste should be refused.
To accomplish that, you’ll have to make some changes to the code. First, go to the ReservationService class. Here, replace the method tryCreateReservation with the following code:
public Optional<String> tryCreateReservation(Reservation reservation, boolean validatePastDate) {

        LocalDate today = clock.instant().atZone(clock.getZone()).toLocalDate();

        if (validatePastDate && reservation.getDate().isBefore(today)) {
            return Optional.of("past-date");
        }

        if (!canAccept(reservation))
            return Optional.of("no-seats");

        UUID id = UUID.randomUUID();
        reservationRepository.insertReservation(id, reservation);
        return Optional.empty();
}Code language: Arduino (arduino)
Now, go to the ReservationController class. Add a value parameter at the top of the class:
@Value("#{ @environment['split.api.treatement-name'] }")
private String treatmentName;Code language: Elixir (elixir)
Replace the method addNewReservation so it looks like this:
@PostMapping
    public void addNewReservation(@RequestBody Reservation reservation) {

        String treatment = splitClient.getTreatment("ANONYMOUS_USER", treatmentName);
        boolean validateAgainstPastDate;

        if (treatment.equals("on")) {
            validateAgainstPastDate = true;
        } else if (treatment.equals("off")) {
            validateAgainstPastDate = false;
        } else {
            throw new RuntimeException("Couldn't retrieve treatment from Split.");
        }

        Optional<String> errorMessage = reservationService.tryCreateReservation(reservation, validateAgainstPastDate);

        if (errorMessage.isPresent()) {
            String error = errorMessage.get();
            String message = "";
            HttpStatus status = HttpStatus.CREATED;

            if (error.equals("no-seats")) {
                message = "Couldn't accept: there aren't enough seats available.";
                status = HttpStatus.INTERNAL_SERVER_ERROR;
            } else if (error.equals("past-date")) {
                message = "The specified date is in the past.";
                status = HttpStatus.BAD_REQUEST;
            }

            throw new ResponseStatusException(status, message);
        }
    }Code language: Arduino (arduino)
Then, add the treatment-name to your src/main/application.yml file:
split:
  api:
    key: <your split api key>
    treatment-name: VALIDATE_DATECode language: Swift (swift)
Also, when calling the getTreatment method, you should pass a string identifying the logged user as the first parameter. For our example, there’s no authentication, so it’s just ANONYMOUS_USER.
The method now starts by using the Split client to retrieve the treatment for the toggle and using its value to determine whether to check the reservation date. It then goes on to attempt creating a reservation using the service and returning the adequate error message and status code according to the result.
This code still isn’t ready to work because you haven’t defined the actual toggle on Split. That’s what you’re going to do next.
Create Your Feature Flag with Split
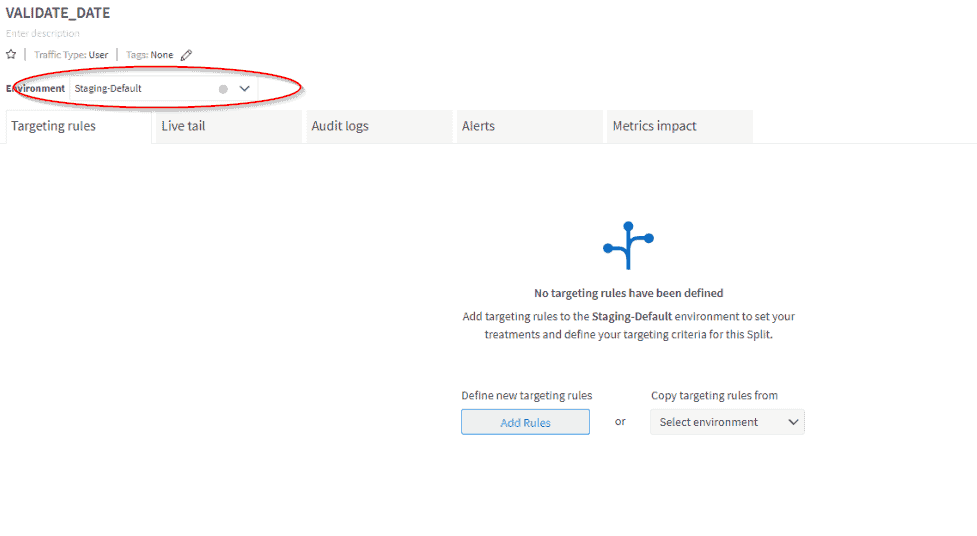
Go back to the Split dashboard. On the left panel, click on Splits, and then click on Create Split. You’ll be prompted for a name. Type VALIDATE_DATE and then click on Create.
You’ll then be asked to define the targeting rules for your new split. Make sure the Staging-Default environment is selected, and then click on Add Rules:
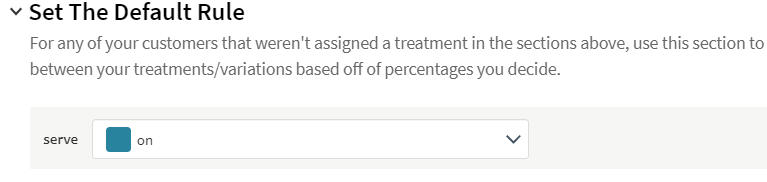
Since you’ve now created a rule for your feature, Split defaults all treatments to off. That’s great because it prevents you from deploying partially complete features accidentally.
Let’s now turn the feature on to see it working in practice. Under Set The Default Rule, select on:
After that, click on Save Changes in the upper right corner of the page. You’ll be redirected to the changes summary page, where you’ll have the chance to review your changes one more time. If everything is correct, you can then click on Confirm.
Now, you can go back to Postman and try submitting a reservation with a date in the past. You’ll get a result like this:
{
    "timestamp": "2020-07-12T02:14:12.632+00:00",
    "status": 400,
    "error": "Bad Request",
    "message": "The specified date is in the past.",
    "path": "/api/reservations"
}Code language: JSON / JSON with Comments (json)
Not Leveraging Feature Flags Is a Red Flag
Having a reliable software release life cycle is essential for any modern software development shop, and it relies on the ability to implement and deploy changes to production swiftly and consistently. This ability, which revolves around techniques like continuous integration and continuous development, is facilitated by feature toggles.
In today’s post, we’ve walked you through how to implement feature toggles in a Spring Boot app using Split. We’ve also covered the basics of feature toggling tools, so you understand why this technique is so powerful and useful.
Learn More about Feature Flags and Software Development with Spring Boot
- Build a CRUD App with Spring Boot and Angular
- Build a Web App with Spring Boot in 15 Minutes
- Continuous Integration: What You Don’t Know Can Hurt You
- To Feature Flag is to Experiment
- Monitor Your Java Application with New Relic
As always, we’d love to have you check out our videos on YouTube, and follow us on Twitter to keep up with what’s new.
Switch It On With Split
The Split Feature Data Platform™ gives you the confidence to move fast without breaking things. Set up feature flags and safely deploy to production, controlling who sees which features and when. Connect every flag to contextual data, so you can know if your features are making things better or worse and act without hesitation. Effortlessly conduct feature experiments like A/B tests without slowing down. Whether you’re looking to increase your releases, to decrease your MTTR, or to ignite your dev team without burning them out–Split is both a feature management platform and partnership to revolutionize the way the work gets done. Schedule a demo to learn more.
Get Split Certified
Split Arcade includes product explainer videos, clickable product tutorials, manipulatable code examples, and interactive challenges.